Liquid penetrant testing (LPT) is a non-destructive testing method of identifying surface flaws in materials such as metals and plastics. Engineers, technicians, and other professionals have used this reliable technique for decades to ensure the integrity of an object or material before it is put into service or released for sale.
By understanding these concepts and following the proper protocols, you can confidently apply LPT to your projects and rest assured that you adhere to industry standards. So, let’s dive in!
What is Liquid Penetrant Testing?
Liquid Penetrant Testing (LPT) is a widely used non-destructive testing (NDT) technique that helps detect surface imperfections and discontinuities in materials. This testing method is based on the principles of capillary action, which involves the penetration of a liquid into surface discontinuities due to surface tension and capillary forces.
LPT is a popular testing method due to its ease of application, low cost, and high sensitivity level. This testing technique can detect surface imperfections on porous and non-porous surfaces, including rough surfaces, welds, steel forgings, and steel tubes.
Two types of penetrant liquids are commonly used for LPT: fluorescent and visible. Fluorescent penetrants are used when testing under ultraviolet light, while visible penetrants can be viewed by the naked eye. The choice of penetrant liquid depends on the sensitivity level required for the testing.
Where To Use Liquid Penetrant Inspection
LPT can be used to inspect materials such as metals, plastics, ceramics, and composites. The testing method is particularly useful in the aerospace, automotive, manufacturing, and construction industries. Let’s take a closer look at where LPT can be utilized:
1. Welds – LPT can be used to detect defects and cracks on welds, which are critical strength points in many structures.
2. Forgings – Steel forgings, such as engine components, can be inspected using LPT to ensure they meet standards for safety and reliability.
3. Tubing – Steel tubes used in pipelines, boilers, and pressure vessels can be inspected using LPT to detect surface imperfections.
4. Castings – LPT can be used to inspect castings for defects such as porosity, cracks, and surface flaws.
5. Machined Parts – Components such as gears, shafts, and other machined parts can be inspected using LPT to ensure they meet the required integrity standards.
6. Maintenance – LPT can be used as a maintenance tool to detect surface cracks and flaws in machinery and equipment. This can help prevent catastrophic failures and save money on repair costs.
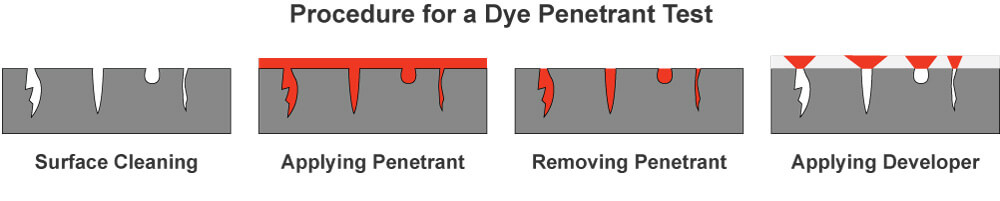
Procedure for a Dye Penetrant Test
Liquid Penetrant Method involves the application of a special-colored liquid, known as a penetrant, to the surface of the material being tested. The penetrant seeps into any surface cracks or openings, and then a developer is applied to the surface. This developer “draws” the penetrant out of the cracks, making them visible to the naked eye. This simple process can reveal defects that may not be visible to the naked eye.
So, what’s the procedure for conducting a dye penetrant test?
Surface Cleaning
The first step in using a visible dye penetrant is surface preparation. The surface of the material being tested must be free from any dirt or debris that may interfere with the testing process. Any excess material should be removed using wire brushing, grinding, or solvent degreasing. It is important to ensure that the surface is completely dry before proceeding to the next step.
Applying Penetrant
The next step involves the application of the visible dye penetrant. This can be accomplished using a spray gun or brush. The penetrant is allowed to dwell on the surface for a specified period. Typically penetration time is between 5 and 30 minutes to allow it to penetrate into any surface openings due to capillary action.
Removing Penetrant
After the dwell time has elapsed, it is time to remove the excess surface penetrant from the surface. This can be accomplished using a clean cloth or water rinse. It is important to avoid over-cleaning the surface as this may remove the penetrant from any surface discontinuities, resulting in a false inspection.
Applying Developer
The application of the developer is the next step in the process. It is applied onto the material’s surface after the excess penetrant has been removed. The developer draws any penetrant out of surface discontinuities and creates a visible indication on the surface. The method of application may vary depending on the type of developer used.
Inspect the Test Area
The final step involves the inspection of the surface under visible light to observe any visible indications. The sensitivity level of the inspection can be adjusted by using different types of penetrants and developers and by varying the dwell time. It is important to note that the indication may be faint, so carefully examining the surface is necessary.
Tips for Liquid Penetrant Testing
It is important to follow certain procedures and tips to achieve accurate results with this testing method. Here are a few tips for achieving optimal results with penetrant inspection:
1. Surface Preparation – Proper surface preparation is the first and most critical step in liquid penetrant testing. Before applying the penetrant, ensure the surface is clean and free of grease, oil, dirt, or loose debris. Any residue left on the surface can interfere with the capillary action of the penetrant, leading to false indications and inaccurate results. So, it’s important to use approved solvents and cleaning agents to degrease and clean the surface before testing.
2. Drying the Surface – After cleaning, it’s important to ensure the surface is completely dry before applying the penetrant. Any residual moisture on the surface can affect the capillary action of the penetrant, leading to inaccuracies in test results. So, let the surface air dry or use a clean, lint-free cloth to dry it.
3. Penetrant Application – Before applying the penetrant, ensure that the surface is completely dry. Next, apply the penetrant using a spray, brush, or dip method, depending on the part’s application. Penetrant dwell time should be included in the application instructions. Since excess penetrants can obscure discontinuities and hinder inspection, wipe off the excess penetrant with a clean cloth after the dwell time.
3. Developing the Surface – After the required time (Dwell Time) for the penetrant to reach any surface discontinuities, it’s time to apply a developer. Applying a developer causes the penetrant to come out of the porosity and form an indication, making the flaw visible. The developer should be applied uniformly, and any deviations from the application instructions should be avoided.
5. Inspection – The test part should be conducted under suitable lighting conditions. This involves visual inspection for the detection of visible indications. The inspection should be done in a clean and well-ventilated area, free of any material that may compromise the accuracy of the test results.
6. Record Keeping – Record keeping is essential for penetrant testing. The test record should be organized and contain all test data necessary to complete the test analysis and evaluation. The test data collected should include defect type, indication size, location, and other necessary information.
Classification of Penetrant Materials and Processes
Liquid Penetrant Types
Type I – Fluorescent Penetrant
Type I penetrants consist of liquid penetrants that demonstrate the property of fluorescence when exposing to UV radiation. The fluorescence property of a chemical means certain chemicals’ capability to emit visible light when exposed to ultraviolet radiation (Blacklight).
Type I penetrants have high sensitivity, which means excellent ability to detect small surface discontinuities. Type I’s high sensitivity is due to the highly visible indications the fluorescent penetrant will emit when exposed to blacklight even from a tiny quantity of penetrant at a tiny discontinuity.
Type II – Visible Penetrant
Type II penetrants consist of liquid penetrants that contain visible red dye dissolved in the penetrant oil. An application of a white developer layer following the penetrant removal provides a high contrast background to enhance visibility.
Type III – Dual-Mode Penetrant
Type III penetrants consist of liquid penetrants containing dyes to provide high contrast indications under normal light and have fluorescence property that emits lights and exposes indications when exposed to black light.
Methods of Penetrant Removal
Method A – Water Washable Penetrant
Liquid penetrants are typically oil-based products made of petroleum oil, which means the penetrant cannot be removed with water as the oil is not insoluble in water. Method ‘A’ penetrants use emulsifier (emulsifying agent) mixed with the penetrant oil on which it makes the penetrant removable with water (water washable).
Water-washable penetrants are the type of penetrants formulated with an emulsifier mixed with the penetrant oil to permit direct removal with water spray, immersion, or manually wiping.
Method B – Post-emulsifiable Lipophilic Penetrant
Method ‘B’ penetrants do not contain emulsifying agents, and thus, penetrants cannot be removed entirely with water. The penetrants are formulated to provide enhanced penetrating and visibility characteristics. The removal of the penetrant occurs by applying an emulsifier in a separate step post penetrant dwell time.
Lipophilic emulsifier application occurs to transfer the excess penetrant on the surface of the tested piece to an emulsifiable mixture that can be washed with water.
Method C – Solvent Removable Penetrant
Method ‘C’ penetrants are usually either post emulsifiable penetrants that are more common or water washable penetrants. However, the penetrants can also be removed with solvents used by wiping the surface to remove excess penetrants. Usually, the solvent is supplied and used in an aerosol spray can.
Method D – Post-emulsifiable, Hydrophilic Penetrant
Method’ D’ penetrants are similar to Method ‘B’ Lipophilic Penetrants. The difference is the hydrophilic emulsifier method requires a water-based remover solution; hence, removing the excess surface penetrant occurs using a detergent action rather than an emulsification action.
Levels of Penetrant Sensitivity
The penetrant test sensitivity is the testing process’s ability to measure the smallest discontinuity and display it as a clear indication.
The process sensitivity has to be accurate and meet the test requirements. If the process sensitivity is high, the result will display irrelevant indications and creates misleading results during the evaluation process. If the process sensitivity is low or not sensitive enough, the process may not reveal discontinuities beyond the application’s acceptance criteria, causing defects to remain without detection.
The sensitivity level of the penetrant testing materials is directly connected to the material’s cost; the higher the sensitivity, the higher the material’s cost; hence, the selection must be appropriately made based on the application to avoid unnecessary expenses.
Fluorescent penetrant is defined by the sensitivity level category as follow:
- Sensitivity Level 1/2 – Ultra-Low sensitivity.
- Sensitivity Level 1 – Low sensitivity.
- Sensitivity Level 2 – Medium sensitivity.
- Sensitivity Level 3 – High sensitivity.
- Sensitivity Level 4 – Ultra-high sensitivity.
Forms of Developer Application
Form a – Dry-powder Developer
A dry developer is the type of developer which is in powder form; the powder is fluffy and forms a thin film on the workpiece whenever it is applied.
The dry developer is suitable for fluorescent penetrants that give good development properties. Whenever dry powder is used with fluorescent penetrant and under blacklight, the developer provides good contrast between the workpiece and the penetrant on the discontinuities.
The dry developer is not suitable for visible penetrant as the developer does not provide a contrasting background.
Form b – Water-soluble Developer
A water-soluble developer is an aqueous developer that is dissolved in water. The water-soluble developer is suitable for fluorescent penetrants but not recommended for use with visible penetrants.
The water-soluble developer is not recommended for use with the water-washable removal method. The developer’s water may remove water-washable penetrant from discontinuities, erasing defects and affecting the process reliability.
Water-soluble developer comes in the form of dry concentrate; the dry concentrate is then mixed with water to a proper ratio. The ratio of developer concentrate to water is regularly checked as well as the percentage of penetrant contamination.
Form c – Water Suspendable Developer
Water suspendable developer is an aqueous developer that does not dissolve in water as a water-soluble developer but remains suspended in the water. The mixture must be thoroughly agitated before application. Water suspendable developer is suitable for visible penetrants.
Water-soluble developer comes in the form of dry concentrate; the dry concentrate is then mixed with water to a proper ratio. The ratio of developer concentrate to water is regularly checked as well as the percentage of penetrant contamination.
Form d – Nonaqueous, Type I, Fluorescent Systems (solvent-based), and Form e – Nonaqueous, Type II, Visible Dye Systems (solvent-based) Developer
Nonaqueous developers are the type of developers that suitable to use with all penetrant types and methods. Nonaqueous developers are the most sensitive developer method available.
Nonaqueous developers are supplied in aerosol spray cans or bulk containers; whenever the developer is in aerosol spray cans, no further process control is required. However, the developer must be thoroughly agitated and mix appropriately before spraying whenever the developer is in bulk containers.
Form f – Special Applications Developer
Special application developers are developers that have been produced for a specific application; the developers are usually made to be suitable to use with certain penetrant materials. Before the developer’s use, a qualification process takes place to verify and approve the system’s reliability.
Class of Solvent Remover
Class 1 – Halogenated
Halogenated solvent removers are solvents that contain a halogen such as fluorine, chlorine, bromine, or iodine.
Class 2 – Non-halogenated
Non-halogenated solvent removers are solvents that do not contain a halogen.
Class 3 – Specific Application
Special application solvent removers are solvents that have been produced for a specific application; the solvent removers are usually made to be suitable to use with a particular process or penetrant materials.
Conclusion
In conclusion, liquid penetrant testing is a simple and cost-effective method of detecting surface discontinuities and defects in various materials. With the right knowledge, safety protocols, and tools, it can be an essential part of any quality control program.
We hope this has been a helpful resource for those interested in learning more about liquid penetrant testing techniques.
Reference:
- NAVAIR 01-1A-16 – TECHNICAL MANUAL – NONDESTRUCTIVE INSPECTION METHODS, BASIC THEORY.
- SAE AMS 2644 – Inspection Material, Penetrant.