In the fabrication industry, welding defects are common and cannot be completely avoided. These defects can be attributed to various factors such as incorrect welding process, improper settings of welding parameters, wrong welding techniques, lack of welding skill, or even the use of incorrect welding tools and consumables.
Throughout the welding procedure, welding defects can occur at any stage and impact both the inside and outside of the metal structure. This article aims to provide a comprehensive overview of different types of welding defects, their causes, potential remedies, as well as tips for distinguishing between good and bad welds.
What is a Welding Defect and Weld Discontinuity?
A welding defect is an undesirable mistake or deficiency that occurs in the weld, which can impact the functionality of the product where the weldment is used in. These defects can happen for various reasons, such as using the wrong welding method, not using suitable consumables, rushing the job, or lacking welding skills.
Some welding defects can be seen easily by the naked eye, while others require non-destructive testing to detect. Minor welding defects might be accepted depending on how the weld will be used, but in structural welds, defects are usually not allowed due to safety concerns.
It’s important to note that most welding defects can be fixed through rework. However, rework can be time-consuming and expensive, and the repaired weld may not be as good as the original. Therefore, it’s always best for a welder to aim for a defect-free weld bead from the start.
Weld discontinuity refers to a break or interruption in the weld joint. Unlike welding defects, weld discontinuities are not necessarily caused by incorrect welding practices. They can occur due to changes in the base material, welding technique, or other factors.
The severity of a weld discontinuity depends on its impact on the structural integrity and performance of the welded component. Weld discontinuities may also require repair, but the acceptance of a repaired weld depends on its intended use and is ultimately determined by the welding inspector.
Common Types of Welding Defects, their Causes & Remedies
Let us discuss thoroughly the most significant welding defects, their causes, and how to resolve them:
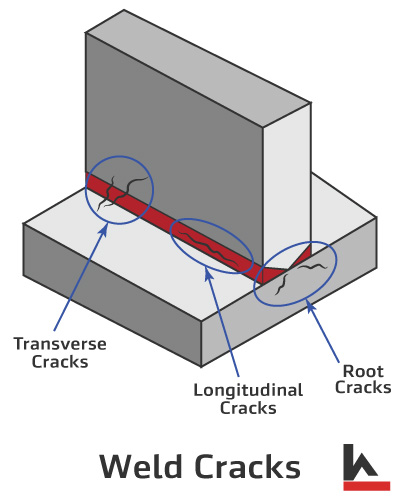
1. Weld Cracks
A weld crack is a severe type of welding defect, and a weldment with a crack cannot be accepted. These cracks can happen on the weld metal, the heat-affected zone “HAZ” (the area near the weld bead ), or the base metal.
If a weldment has cracks, it can sometimes be repaired by grinding or gouging the cracks and welding again in the right way. But, whether the repair is acceptable or not depends on the weld inspection.
There are different types of weld cracks, like hot cracks, cold cracks, and crater cracks (hot cracks are also called solidification cracks). Depending on where the crack is, it can be called a longitudinal crack, transverse crack, root crack, throat crack, toe crack, and so on.
Cold Cracks
Cold cracks may become visible when the completed weldment is cooled or become visible after many hours or even days after welding. This defect is normally found when welding steel and the reason is steel structural deformities.
Hot Cracks or Solidification Cracks
Hot crack occurs in the weld zone during weld metal solidification. The cause of hot cracks is the micro stress formed from the shrinkage of the weld metal, and this stress pulls the weld metal apart as it cools from molten metal to solid.
Hot crack happens when the ratio of depth to width of the weld bead is large. This type of crack can be prevented by preheating the weld joint or using soft (ductile) filler metal.
Longitudinal Cracks
Longitudinal crack runs in the direction parallel to the weld, and it can be seen on weld beads or base metal. The cause of longitudinal crack can be faster cooling of weld metal or due to shrinkage stresses (in high constraint areas).
Longitudinal cracks can be generally prevented by preheating base metals and changing the welding direction towards a lesser constraint area.
Transverse Cracks
Transverse crack runs transverse to the welding direction. The cause of the transverse crack is the hardness of the weld metal.
The transverse cracks can be prevented by reducing the weld heat and preheating the base metals before welding.
Crater Cracks
A crater crack is a crack of the shape of an ‘X’ found in a crater, which is hot crack. These cracks occur at the end of the welding process before the operator completes the weld joint.
The cause of crater crack is the middle or center of the molten weld pool solidifies before the outer weld pool, and hence the middle part is pulled apart during cooling.
Crater cracks can be prevented by properly terminating the welding and filling the crater at the weld termination.
Throat Cracks
A throat crack is a longitudinal crack at the throat of a fillet weld. The cause of throat crack can be due to transverse stress from shrinkage and insufficient filler metal selection.
Throat cracks can be prevented by increasing the preheat of base metals and using a soft (ductile) filler metal.
Toe Cracks
Toe cracks are the cracks in the base metal, and the crack starts from the toe (edge) of the lap joint weld bead. The cause of toe cracks can be transverse shrinkage stress and brittleness in the heat-affected zone (HAZ).
Toe cracks can be prevented by increasing the preheat of base metals and using a soft (ductile) filler metal.
Root Cracks
Root crack is the weld crack that starts at the bottom of the weld (root) and extends into the base metal. The causes of root crack can be due to not using proper filler metal, low initial current, and hydrogen embrittlement.
Root cracks can be eliminated using proper initial current, preheating the weld joint, correct weld joint formation, and correct filler metal.
The causes of welding cracks:
- Hydrogen presence during welding ferrous metals.
- Non-uniform heating and cooling, during and after welding, and the resultant residual stresses.
- The shrinkage of weld metal during solidification can cause residual stress and cracks.
- Contamination in base metal (base metal was not cleaned before welding).
- Low current setting and higher welding speed.
- Base metals have no preheating (especially those with more carbon content).
- Base metal contains excess sulfur and carbon.
- Poor design of the weld joint.
How to overcome welding cracks:
- Preheat the base metals as recommended.
- Ensure the base metal is cleaned and there are no impurities on it.
- Use the recommended weld joint design.
- Set the welding machine to the recommended welding current and use the recommended welding speed.
- Ensure the cooling of the weldment as recommended by the welding procedures.
2. Undercut
An undercut is a welding defect or imperfection. This defect can be seen as grooves at the edge/toe of the weld (near the toe of the weld bead, which left unfilled).

The causes of undercut:
- High current setting.
- Long arc length.
- Contamination or rust on the welding surface.
- Improper or poor welding technique, including the use of the wrong angle.
- Using the wrong size of welding electrode or filler wire.
- Weld speed is fast.
How to overcome undercut:
- Use the correct size of electrode or filler wire.
- Set the current to a moderate level (control the arc length) and use optimum weld speed.
- Weld with the correct welding angle.
- Maintain a safe distance of the electrode tip from the workpiece interface.
- In the case of MIG/TIG welding, use the recommended shielding gas.
- Use more welding passes, if necessary.
Repair:
The undercut defect has tolerance, and it can be used if it is within the allowable tolerance. Otherwise, it can be repaired by grinding and re-welding.
3. Porosity
Porosity is the pores caused by the gas entrapped in the molten weld metal during solidification. The gasses trapped in the weld metal escape, leaving a porous and weak weld metal behind. Porosity in the weld metal may also be due to contamination of the weld metal.

The causes of porosity:
- Contaminated gasses are trapped in the molten metal.
- A longer welding arc or unstable arc is used.
- The deoxidizer in the electrode was not adequate (deoxidizers present in the welding electrode or wire stop oxygen from forming oxides and the resulting porosity).
- The gas shield was not proper or not adequate.
- Moisture in the welding area.
- The base metal has contamination (not cleaned correctly), and the contaminants can be oil or grease, paint, rust, etc.
How to overcome porosity:
- Clean the base metals correctly and dry them before welding.
- Ensure the electrodes are dry.
- In the case of MIG/TIG welding, ensure the gas flow is set correctly.
- Use the recommended welding electrode/filler wire and welding technique.
- A higher travel speed may not allow the gas to escape, hence, controlling the arc travel speed.
4. Incomplete Fusion
The welding defect occurs due to an improper fusion between the base metal and the parent metal (lack of cohesive bond between the weld metal and base metal), or it can be between two adjacent weld beads.
Incomplete fusion is visible as a gap in the weld joint (the gap indicates that the area is not filled with weld metal). It can also be a discontinuity in the welding zone. When the welder cannot properly melt the parent metal with the base metal, it results in a lack of fusion.

The causes of imperfect fusion:
- Lower heat input (current setting is low).
- Improper welding technique (wrong electrode angle, faster travel speed, etc.).
- Shorter arc gap.
- Base metal is not preheated.
- The weld penetration of the weld joint is not proper.
- The design of the weld joint is not correct.
- Contamination on the weld surface.
How to overcome incomplete fusion:
- Ensure the welding surfaces are clean.
- Use the recommended weld current (sufficient for weld fusion) with suitable arc voltage.
- Use the recommended electrode/filler wire size and the correct welding technique.
Repair:
Can be repaired by grinding and re-welding the defect area appropriately.
5. Incomplete Penetration
The welding defect incomplete penetration happens when the weld metal does not fill the complete weld groove. This means the weld did not penetrate the complete joint thickness.

Causes of incomplete penetration:
- The low current setting and the heat are insufficient to melt the required quantity of weld metal.
- Root opening (root gap) was not sufficient.
- Shorter arc length.
- The welding speed was high, so sufficient weld metal was not deposited.
- Wrong size of the electrode.
How to overcome incomplete penetration:
- Use correct weld joint geometry and ensure the gap between the workpieces is correct.
- Use the recommended ampere setting.
- Control the welding speed.
- Use the recommended size of the electrode.
Repair:
This defect can be repaired by gouging and back welding the joint.
6. Insufficient fill
The weld defect insufficient fill is visible as a weld surface lower than the adjacent workpiece surfaces (the weld surface looks concave). Insufficient fill on the weld bead is called underfill; when it happens on the root of the weld, it is called suck-back.

Causes of insufficient fill:
- Not following proper welding techniques.
- Using incorrect welding parameters.
How to overcome insufficient fill:
- Follow the correct welding techniques considering the type and position of welding.
Repair:
Insufficient fill can be repaired by cleaning the weld bead by hand grinding and welding appropriately to fill the under-fill.
7. Slag Inclusion
Slag inclusion is a welding defect found in welding processes that use a welding rod or wires that contain flux. Shielded Metal Arc Welding (stick welding), submerged arc welding, and flux-cored arc welding.
Slag inclusion can occur when the flux melts, forming a protective shield on the weld metal. A part of the slag may get inside the weld metal (entrapped in it), it may occur either on the surface of the weld metal or in between welding beads.

Causes for the Slag inclusion:
- Low weld current.
- In the case of multi-pass welding, the weld bead is not properly cleaned before welding the next pass.
- Improper welding speed.
- Contamination in weld surfaces.
How to overcome slag inclusion:
- Use recommended welding speed and current setting.
- Remove the slag and clean the weld bead before going for the next welding pass.
- Control the cooling rate of molten weld metal.
- Ensure the weld surfaces are clean.
Repair:
This defect can be repaired by grinding and welding once again.
8. Tungsten Inclusion
Tungsten particles can get entrapped in the weld metal during GTAW (TIG) or plasma arc welding (PAW) process.

Causes of the tungsten inclusion:
- A short tungsten electrode is used.
- High current setting.
- The tungsten electrode comes in contact with the weld pool or the filler wire.
How to overcome tungsten inclusion:
- Use the correct tungsten electrode, follow recommended current setting, and do not allow the tungsten electrode to touch the weld pool and filler wire.
Repair:
This defect can be repaired by grinding and re-welding appropriately.
9. Burn Through
The weld defect burn-through happens when an undesired through hole is created during the welding (due to the excess heat generated), and this is a common defect when welding thin gauge workpieces. Sometimes, the burn-through hole may not be visible on the surface; however, it may be detected by a radiography test.

Causes for burn through:
- Higher current setting.
- High heat input.
- More gap between the two workpieces.
- Slow welding speed.
How to overcome burn through:
- Use the recommended current setting.
- Maintain the correct gap between the workpieces.
- Maintain the correct welding speed to reduce the heat input.
Repair:
Appropriate grinding and welding techniques may correct burn-through.
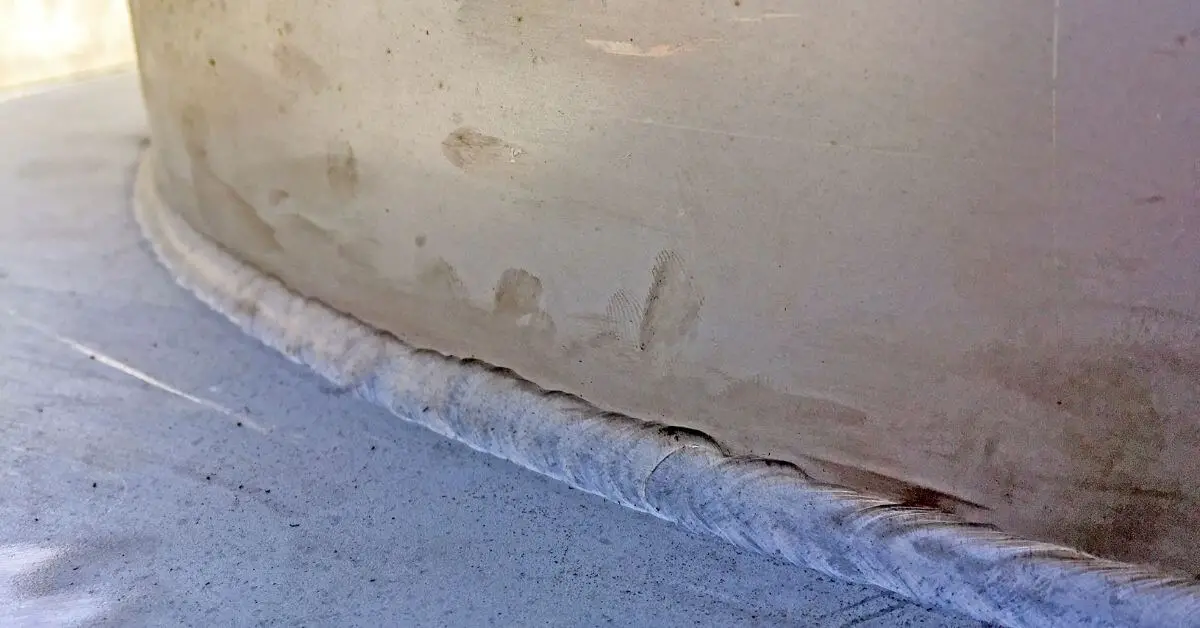
10. Spatters
Spatters are visible small weld metal particles sticking around the weld bead in a scattered manner. The small particles are the molten weld metal droplets expelled from the welding electrode. It is a very common weld defect and cannot be completely avoided. However, it can be minimized.

The causes for weld spatters:
- High welding current.
- Long weld arc.
- Contaminated welding surface.
- Wrong selection of welding polarity.
- Shielding gas was not proper.
How to overcome weld spatters:
- Use the recommended ampere setting.
- Use the correct polarity.
- Use the recommended weld arc.
- Clean the weld surfaces before welding.
Repair:
Spatters can be removed by grinding or sanding.
11. Crater (Arc Crater)
The weld crater is a welding defect and is visible as the unfilled end of the weld (weld metal is not filled over the complete cross-section), and it happens when the welder stops the welding arc before the weld joint is formed till the end.
The unfilled end of the welding will be a weak spot and can be a reason for weld cracks. A Weld crater means ‘not using adequate weld metal to fill the weld groove over its complete length and cross-section.
The causes for crater:
- Stopping the welding process before its completion (premature stopping of welding).
- Not using proper welding technique.
How to overcome crater:
- Using a runoff tab (by tack welding a runoff tab at the end of the workpiece) will help the welder to extinguish the welding arc only after the welding is complete (without forming a crater).
- Use the recommended welding technique.
Repair:
If there are no cracks, the unfilled portion can be welded after cleaning the weld bead.
12. Overlap
The weld defect overlap happens when the weld metal flows out of the weld groove (beyond the edge/toe of the weld bead) and into the base metal without fusing with the base metal.

The causes for the overlap:
- Contamination of the weld surface (base metal).
- The weld heat is not sufficient.
- Improper weld travel speed.
- Not using the correct welding technique.
- The welding electrode used may be larger.
How to overcome overlap:
- Use the recommended current setting.
- Use the recommended weld speed.
- Use the correct size of the electrode.
- Use the correct welding technique.
- Ensure the welding surfaces are clean before starting the weld.
Repair:
The overlap can be removed by hand grinding.
13. Excessive Convexity or Concavity – Fillet Welds
We say that the fillet weld has excessive convexity or concavity when the actual fillet size exceeds the allowed limits.

The causes of excessive convexity or concavity:
- Improper setting of welding current.
- Improper welding speed.
How to overcome excessive convexity or concavity:
- Use recommended weld current and welding speed.
Repair:
This defect can be repaired by grinding off (convexity) or by adding welding (concavity).
14. Reinforcement
Reinforcement indicates the amount of weld metal filled into the weld groove beyond the surface of the workpieces. The reinforcement can be excessive or insufficient. This may be at the face of the groove or the root.
The reinforcement is required for the strength of the weld joint. However, excessive reinforcement or insufficient reinforcement is considered weld defects.

Excessive reinforcement
Excessive reinforcement can create stress concentration at the edge/toe of the weld.
The causes for excessive reinforcement:
- Low welding current.
- Very low welding speed (travel speed).
How to overcome excessive reinforcement:
- Use the recommended welding current and welding speed.
Repair:
The excessive reinforcement can be repaired by grinding.
Insufficient reinforcement
This is also known as weld concavity or under-fill.
The causes for insufficient reinforcement:
- Less or insufficient deposition of filler metal.
How to overcome insufficient reinforcement:
- Use the correct welding technique.
- Use a backing strip or bar for root pass, if needed.
- Use back weld.
Repair:
The insufficient reinforcement can be repaired by adding more welding layers.
15. Joint Misalignment
The welding defect misalignment is visible as a weld joint that is out of alignment, and the misalignment can be linear or angular.
The causes of joint misalignment:
- Incompetence of the welder.
- Welding dissimilar thickness workpieces
How to overcome joint misalignment:
- By assigning a proficient welder to handle the task with extra care.
Repair:
If the misalignment is not too severe, it can be fixed by manual grinding and adjusting the alignment. But, if the problem occurs while welding a pipe, it’s not always feasible to access the pipe’s from inside for rectification.
16. Weld distortion
Weld distortion is not an actual defect in welding, but it can impact how well the weldment functions. It is important to be mindful of weld distortion and take precautions to prevent it. Essentially, weld distortion refers to the changes in the shape and position of the workpieces before and after welding.
Without proper care during welding, the workpieces can bend or twist, causing issues. To ensure quality welds, minimizing weld distortion and maintaining the workpiece’s intended shape and position is crucial.
The causes for weld distortion:
- Not following the correct welding sequence.
- Not using the technique of tack welding before full welding.
- Not using supporting fixtures to minimize distortion.
- Using multiple welding passes with small-size electrodes.
How to overcome weld distortion:
- Follow the correct sequence of welding.
- Tack welds the workpieces before full welding.
- Use the recommended fixtures and clamps to support the workpieces.
Repair:
Slight distortions can be removed by stress relieving, heating, straightening, etc.
FAQs About Welding Defects
What is the difference between external and internal defects?
An internal welding defect is a flaw or imperfection within the weld, typically within the weld metal or the heat-affected zone. Examples of internal welding defects include internal cracking, porosity, incomplete fusion, and incomplete penetration. These defects are not visible to the naked eye and can weaken the structural integrity of the weld.
On the other hand, an external welding defect refers to a flaw or imperfection visible on the weld’s surface. Examples of external defects include surface cracks, surface spatter, undercut, and overlap. These defects are visible to the naked eye and can affect the aesthetic appearance of the weld.
What are some common types of welding defects, and how do they occur?
Several types of welding defects can occur during the welding process. Some potential defects include incomplete penetration, porosity, lack of fusion, and undercut.
These defects can occur for various reasons, such as incorrect welding patterns, using the wrong welding process (such as MIG welding or flux-core arc welding instead of TIG welding), or using the incorrect settings for the welding machine.
What causes incomplete penetration, and how can it be remedied?
Incomplete penetration occurs when the weld doesn’t correctly penetrate through the thickness of the base metal. Incorrect welding patterns or the wrong welding process can cause this.
To repair this, you can adjust the welding pattern to ensure complete penetration or use a different welding process that better suits the thickness of the base metal.
How can porosity be prevented during the welding process?
Porosity occurs when gas pockets get trapped in the weld, creating small, trapped bubbles in the surface of the weld.
To prevent this, ensure that you clean and free the surface of the base metal from debris and adjust the welding settings to ensure proper gas coverage during the welding process.
What is undercut, and how can it be remedied?
Undercut occurs when the side of the joint is eroded due to excessive heat during the welding process.
This can be remedied by adjusting the welding pattern to prevent excessive heat buildup in a single area or by adjusting the welding settings to ensure proper heat distribution throughout the weld.
Conclusion
We hope you are now equipped with the knowledge to identify and overcome various defects during welding operations, whether caused by welding thin parts or due to wrong welding procedures. You now know how to fix any imperfections.
Remember, welding is an art that requires patience, practice, and perfection, and with the information we have provided, you can now master this skill like a pro. So go out there and weld with confidence!