Propulsion shaft line sections are commonly connected by means of bolted flanges. The normal design intent is for torque and power to be transmitted by means of friction between the flange faces. The maximum friction, hence maximum torque, across the flange joint is proportional to clamping force between the flanges generated by bolt tension. In addition, concentricity/ alignment between the flanges is given by the fit of each bolt in its hole.
Tapered sleeve, hydraulically fitted bolts are available for rotating power transmission flanges and offer the following main advantages:
- The use of a hydraulic jack to pre-load bolts provides high bolt tension with low variation bolt-to-bolt. Shaft flanges using hydraulically tensioned bolts typically exhibit less fretting corrosion damage in service than those using conventional fitted bolts. (Fretting is a result of micron magnitude relative movement between flanges associated with lower maximum friction between flanges.)
- The expanding tapered sleeve design provides accurate alignment between holes in each flange, and hence, the mating flanges.
- The expanding tapered sleeve design allows quick and assured dismantling of the flanged joint. There is little risk of additional work and delays in dismantling the shaft line.

Hydraulically tensioned, plain clearance bolts, i.e., without an expanding sleeve, are found in other applications, including:
- Diesel engine main bearing housing cap studs, connecting rod large-end bearing cap studs and cylinder head studs.
- Holding-down bolts for main engines and other major machinery items such as deck cranes.
- High-pressure pipe flanges.
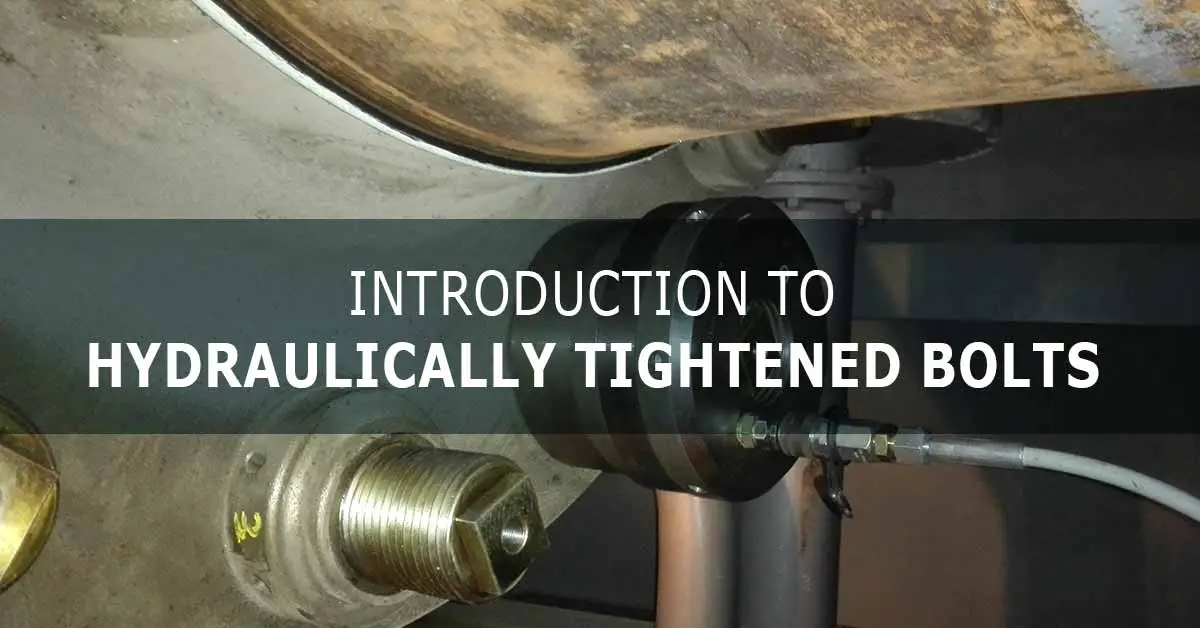
Principles of hydraulically expanding sleeve bolts
Bolts comprise; a shank with a tapered section at the axial center and threads each end, a thin-wall sleeve, and two nuts, Figure 1. The shank also has a central oil gallery and oil distribution grooves on the tapered surface. The thin-wall sleeve bore is an accurate mating fit to the tapered shank, and the outside has clearance in the flange hole of about 0.10 mm when unstressed. The nuts are circular outside with radial holes to fit a small bar for turning by hand.

The following tools are required for fitting and dismantling hydraulically tightened, expanding sleeve bolts:
- Hollow jack – This will be specific to the bolt set size to develop the design pull force for the specified pressure. The internal thread of the jack will fit the bolt thread.
- Setting bridge piece – This will be a clearance fit over the bolt thread and have a spigot to fit in the hole and force the sleeve up the taper. The spigot length will position the sleeve in the axial center of the flange.
- Tension bridge piece – This will fit over the nut and has a window for the bar to turn the nut.
- Removal bridge piece – This will be a clearance fit over the bolt thread and have a spigot to fit in the hole and force the sleeve down the taper. Note some manufacturers do not use a removal bridge.
- High-pressure hydraulic pump.
Fitting hydraulically expanding sleeve bolts
The following preparations are suggested:
- Check the high-pressure oil pump reservoir is full of oil.
- Check the high-pressure hoses are in satisfactory condition and free of kinks. Note that hydraulic hoses have non-return valves at each end which are opened when fitted to a coupling. If the hose is not fully connected, then the non-return valve may not be open, and when the pump is operating, the pressure will be indicated at the gauge, but there will be no flow of oil and no pressure at the jack.
- Check the jack piston is fully retracted, i.e., nearly flush with the jack body outer diameter. It is good practice to check this every time you apply the jack to a bolt. Use of a tensioning jack that is not fully retracted, or hoses not fully coupled, has been the root cause of previous machinery failures.
- Each bolt should be cleaned, paying particular attention to the two tapered mating surfaces. Each bolt and sleeve should be kept as a set. The tapered joint should be liberally coated in oil before assembly.
- Each bolt hole in the flanges is unique in diameter and location. Identifying marks at each hole on both flanges must correlate. The outside diameter of each sleeve is unique for its designated hole and, thus, identifying marks on the bolt must correspond to the stampings at both flange holes.
- Each bolt needs to be fitted with the taper and central oil gallery port facing the direction shown in the assembly drawing, i.e., all bolts to be orientated the same relative to the flanges.
Given the clearance of the sleeve in the hole (unstressed), the bolt and sleeve can be easily offered up and inserted in the flange hole. The flanges need only to be sufficiently aligned for passage of the bolt and sleeve. The bolt is then fitted in two steps:
- The sleeve is expanded. The nuts are not on the bolt at this stage. The setting bridge is fitted over the bolt at the small end of the taper with the jack screwed up until hand tight (the end with the central oil gallery port). The setting bridge spigot should be at its full depth in the flange hole. Connect the high-pressure hydraulic pump and raise the sleeve setting pressure. Note that the pressure is different for sleeve setting and bolt tensioning, with sleeve setting likely being lower. It is important to observe that the piston extends from the jack body, i.e., check that the sleeve was actually expanded. If no visible extension occurs, then the hydraulics should be checked.
- The bolt is tensioned. Fit both nuts hand-tight on the bolt with a small amount of anti-seize grease. The tension bridge is fitted at the small end of the taper with the jack screwed up until hand tight (same end/ side as when expanding the sleeve). Fit the turning bar in the nut through the window in the tension bridge so that the nut can be turned/ tightened the entire length of the window. Connect the high-pressure hydraulic pump and raise the tension pressure. Rotate the nut under the jack as the pressure is increased. Observe the rotation of the nut; the angle should be about that available via the window in the tension bridge. A rotation angle significantly less than the tension bridge window length may indicate a problem with the hydraulics. A rotation angle significantly greater than the bridge window length should also be checked, e.g., due to a slight gap between the flanges.
- The sequence of bolts to be assembled should follow the typical star pattern, e.g., 1-5-3-7-4-8-6-2 on an eight-hole flange. The first two bolts should be expanded before then being tensioned.
- On completion, it is prudent to double-check that all bolts have been tensioned. This can be done using a small hammer to tap the nuts, and each nut should ‘ring’ about the same pitch.
Dismantling hydraulically expanding sleeve bolts
The following preparations are suggested:
- As noted for assembly, check the jack piston is retracted, the hoses are free of kinks, and the high-pressure pump reservoir is full of oil.
- Check the identifying marks at each hole on both flanges, and each bolt is visible, and all correlate.
- Set up any lifting gear on either shaft as may be required after the flange joint is released.

Dismantling each bolt is a two-step process the reverse of assembly:
- The bolt tension is released. The tension bridge is fitted at the small end of the taper with the jack screwed up until hand tight. Fit the turning bar in the nut through the window in the tension bridge so that the nut can be turned/ loosened the entire length of the window. Connect the high-pressure hydraulic pump and raise the pressure while trying to rotate the nut. When the nut becomes free, loosen about one full revolution. Note the pressure at which the nut is released; this should approximately equal the specified tensioning pressure, significant deviations should be checked. Both nuts should be removed from the bolt.
- The sleeve expansion is relaxed. The removal bridge is fitted over the bolt at the large end of the taper with a nut screwed up until hand tight (the end opposite the central oil gallery port). If a removal bridge is not provided, the nut at the large end of the taper is just screwed against the flange face. Connect the high-pressure hydraulic pump to the central oil gallery port and raise the pressure while trying to rotate the nut. When the nut and bolt become free, rotate the nut about one full revolution, then withdraw the bolt and sleeve.
- Each bolt and sleeve should be kept as a set. The bolts should be wrapped in rags and stowed carefully.
Conventional fitted bolts
For comparison fitted bolts, a conventional flanged joint using plain fitted bolts would involve the following:
- Bolt holes are finish machined by reaming or honing for a fine surface finish and close tolerance on a diameter through the bore, e.g., 50H7 (50.000 to 50.025) with 1.6 μm maximum roughness. The flanges are abutted and aligned when machined. Similar size tolerance is applied for hydraulically fitted bolts, but a fine surface finish is not required, e.g., 3.2 μm maximum roughness by normal boring.
- Each hole is measured, and individual bolts are machined to fit between location-transition and location-interference, e.g., 50p6 (50.026 to 50.042). For hydraulically fitted bolts, each sleeve is also individually machined to suit its designated hole (for clearance of about 0.10 mm in the un-stressed state).
- The bolts are typically shrink-fitted using liquid nitrogen. Each bolt should be checked with a micrometer as being a clearance fit before being inserted. If not, there are risks that a bolt can grip when part-way in the hole. Once inserted, bolts are tightened using a sledgehammer and flogging-spanner until the nut ‘rings’.
Dismantling and extracting fitted bolts can often be problematic. Bolts can remain fast, and/or galling can occur between the bolt and the bore during withdrawal. In some cases, it is necessary to drill out the bolt center, to say 70% of shank diameter, then apply a hydraulic pulling jack to extract the bolt. The risks of additional work to remove fitted bolts result in uncertainty and (often) delays in dismantling of the shaft line.
Interesting Article: Intermediate Bearing Alignment Checks Using The Blue Contact Method