In the olden days, riveting was a popular process of joining parts in the engineering industry before modern welding and brazing techniques. Its applications were far-reaching, from metal bridges, ships, automobile bodies, and rail coaches to erecting airplanes and buildings, both commercial and residential.
Though welding has replaced riveting in many areas, the riveting process still retains its relevance. Industries such as automotive and aerospace continue to value their utility even in today’s modern context.
This article provides a comprehensive overview of riveting. It includes an overview of the process and evaluation of rivet materials and types. We also delve into rivet selection, application, and installation process considerations and discuss whether riveting is reversible.
How Rivets Work?
You can define a rivet as a permanent type of fastener with a head at one end and a cylindrical stem (also called a pin) at the other end and is used for joining or fastening two workpieces together. Rivets can take tension loads and are good for shear loads.
A standard riveting process involves inserting the rivet into the rivet hole from the top end of the workpieces, and a rivet head is formed on the other end of the workpiece by hammering or other methods to secure the two workpieces together.
Different types of rivets cater to varying applications, and the rivets are available in different materials.
Different Rivet Materials
The rivets are made in different materials, such as Aluminum, copper, brass, Monel (nickel-copper alloy), steel, stainless steel, non-metals (plastic), etc.
Steel rivets may be coated with zinc to make them resistant to rust. Plastic rivets are used for joining non-metallic materials used in consumer products.
Common Types of Rivets
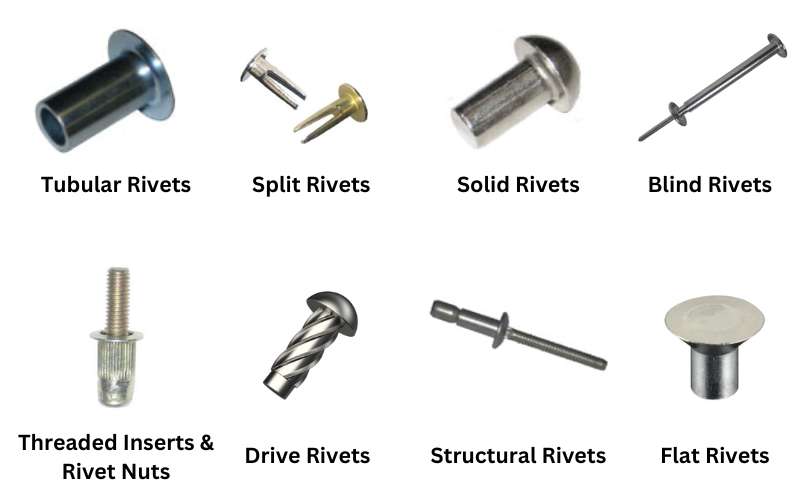
The common types of rivets are blind rivets or pop rivets, self-piercing rivets, rivet nuts, drive rivets, split rivets, structural steel rivets, flush rivets, Oscar rivets, solid rivets, friction lock rivets, and plastic rivets.
The most prevalent rivets in today’s industry are the standard round rivets, self-piercing rivets, blind rivets, countersunk rivets, etc. Blind rivets are used when the other side of the workpiece is not accessible.
1. Blind Rivets (Pop Rivets)
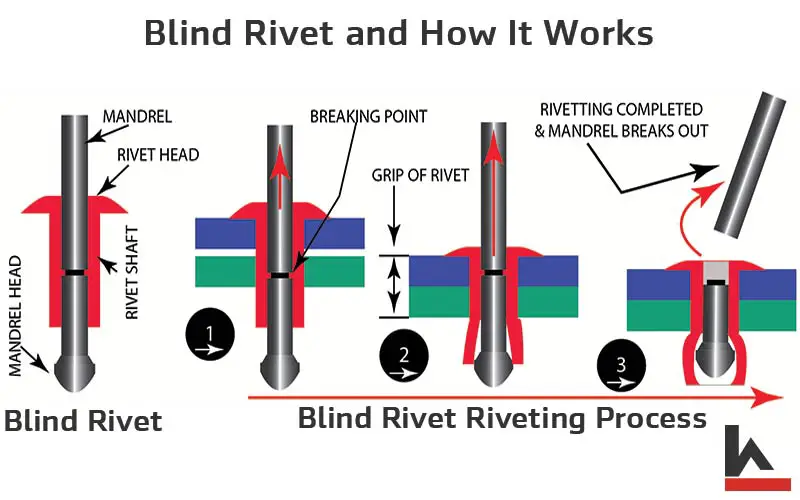
Blind rivets, commonly called pop rivets or hollow rivets, have gained popularity where only one side of the workpiece is accessible. These rivets typically comprise a smooth, cylindrical body and a mandrel through the center.
When used, the rivet is placed into a pre-drilled hole, and a powered rivet gun pulls the mandrel into the rivet body. This action causes the body to expand and shape depending on the surface impedance, eventually forming a secure joint.
One key advantage of blind rivets is their ability to secure joints without needing access to both sides of the workpiece. This functionality makes them ideal for high-volume production settings, difficult-to-reach areas, and where vibration resistance is critical.
Read more about Blind Rivets: What are Blind Rivets [Pop Rivets] | How Do Pop Rivets Work?
2. Self-piercing Rivets
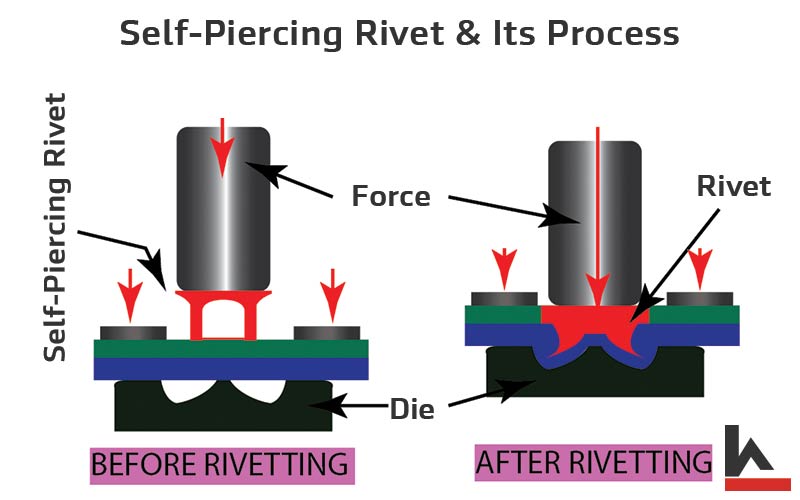
The self-piercing rivet has a flat head and a hollow stem. The chamfered poke (like a punch) at the end of the rivet makes it self-piercing and does not need a pre-drilled hole.
The typical feature of this rivet is it will pierce through the top part but does not come out from the bottom. It forms a strong, water-tight joint by partially piercing the bottom part, and the rivet head formed at the other end depends on the shape of the die in the riveting tool.
This riveting process works well when the rivet and the workpieces are soft metal (like aluminum).
3. Threaded Inserts and Rivet Nuts
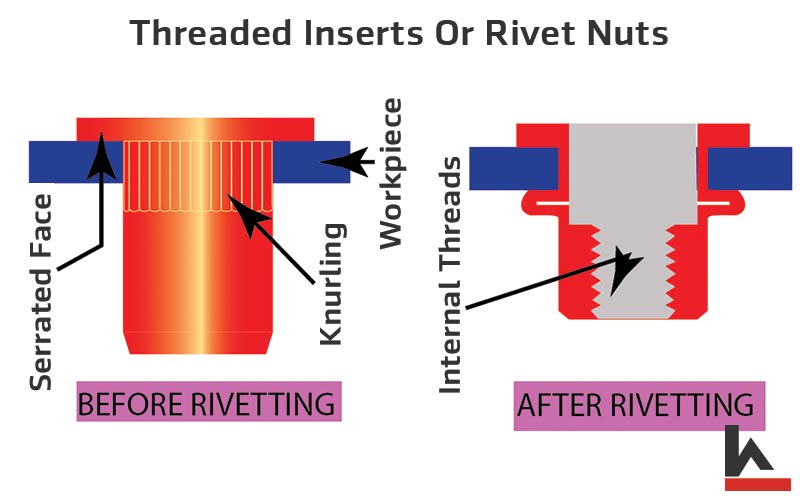
Threaded inserts and rivet nuts are designed for use where riveting can only be conducted from one side. Often referred to as nutserts, these rivets’ nuts look like a flanged bush with straight knurling at its neck end, a hollow head with its internal face serrated, and the bottom half of the bush has internal threads.
For optimal performance, the part’s top and bottom surfaces intended for threaded insert usage must be flat. Upon inserting the threaded insert into the rivet hole, employ a hand tool to pull the bottom end of the rivet towards you. As the insert is pulled upwards, its knurled section compresses and becomes firmly riveted to the bottom face of the part.
This process creates a secure attachment point for subsequent assembly with a bolt, screw, or other fasteners and washers.
Threaded inserts are available in a variety of shapes, including closed-end options. Common threaded inserts consist of full-hex rivet nuts, half-hex rivet nuts, and close-end rivet nuts.
4. Drive Rivets
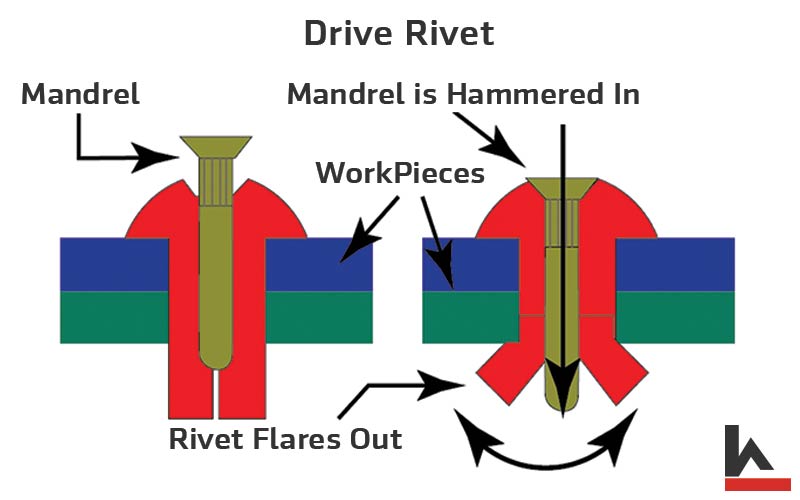
Drive rivets feature a typical construction, with a head, a short mandrel protruding from the head, and another end vertically split at 90°, designed for flaring. When the mandrel is hammered into the head, it pushes into the other end of the rivet, flaring it out and bonding the workpieces.
One advantage of drive rivets is removing them by hammering the short mandrel out from the other side using a punch, reversing the flaring action. The rivet then can be driven out, thus releasing the parts. Although the rivet itself will be discarded, the riveted parts remain intact.
Drive rivets are suitable for light-load applications, such as attaching a traffic board to a slotted angle pillar. Different types of drive rivets are available, including universal head, brazier head, and countersunk head varieties. Though they differ in appearance, all types work in the same manner.
5. Split Rivets
This rivet has a flat head and a shank that is split into two halves over its half-length. This is used for joining soft materials like leather, plastic, and wood. You can insert the rivet through the parts to be joined from one end and bend the split halves of the rivet to either side to fasten the two parts.
This rivet cannot take a heavy load and is used to manufacture leather bags and similar items.
6. Structural Steel Rivets
Historically, steel bridges were commonly held together using steel rivets. However, recent trends have seen these rivets gradually supplanted by sturdy fasteners, typically comprised of bolts, nuts, and washers.
The shift toward using bolts and nuts offers two significant benefits. Firstly, their installation can be executed by semi-skilled workers, simplifying the construction process. Secondly, they provide the option for disassembly, a feature that traditional rivets do not offer.
7. Flat Rivet (Countersunk Rivets)
Flat rivets, also known as countersunk rivets due to their countersunk heads, are designed to fit snugly into a countersunk hole, providing a flush and clean appearance.
Their flush finish creates an aesthetically pleasing look and serves a practical purpose. In manufacturing parts for aircraft, using these rivets eliminates aerodynamic drag, enhancing the overall efficiency of the craft.
8. Oscar Rivets (Similar to Blind Rivets)
Oscar rivets are a type of blind rivets. They come in a set of three splits running along the length of their hollow shaft. As the rivet’s mandrel (or core) is drawn upwards during the riveting process, these splits flare outwards. This outward flaring results in a robust and reliable rivet joint.
9. Solid Rivets
Solid rivets hold the distinction of being the oldest type of rivets utilized in various industries. Solid rivets may require heating before installation because they are known for their strength, tamper-resistant nature, and resistance to vibrations.
They are available in various materials, including Aluminum, copper, brass, steel, stainless steel, and nickel-silver alloys. These rivets are commonly used in applications such as structural steel constructions due to their solid strength.
10. Friction-Lock Rivets
Friction-lock rivets, which come in countersunk or dome shapes, can be likened to an expanding bolt in their functionality. During installation, the shaft or mandrel of the rivet breaks due to tension.
Originally, these rivets represented the main types of blind rivets. Upon their introduction, they saw extensive use in the aerospace industry.
11. Plastic Rivets
Plastic rivets, available in various types, are made from low-density polyethylene (LDPE), nylon, and polypropylene (PP).
They are commonly used in several industries, including consumer electronics, home appliances, and automotive applications for fastening non-metallic parts like bumpers and other elements to car bodies.
Some different types of plastic rivets include push rivets, ratchet rivets, countersunk rivets, and blind-type rivets.
Pros and Cons of the Riveting Process
Advantages of Riveting
- Economical: Riveting is a cost-effective alternative to metal welding and adhesive gluing, as preparing workpieces for riveting is less costly.
- Speed: Riveting is a faster process compared to welding and adhesive joining.
- Variety: The different rivet designs and material options allow flexibility and adaptability. Custom rivets can also be designed based on specific requirements.
- Durability: Rivets offer excellent durability. Outdoor applications often include rivets made from galvanized steel, stainless steel, aluminum, titanium, copper, and other corrosion-resistant metals that can withstand harsh conditions.
- Maintenance: Inspecting, maintaining, and repairing riveted structures is easier and less time-consuming than with welded structures.
Disadvantages of Riveting
- Corrosion: If the workpiece and rivet material differ, corrosion issues may arise in riveted structures.
- Aesthetics: Welded structures typically look more appealing than riveted structures.
- Permanent: Riveted joints are permanent, making them difficult to dismantle. In contrast, bolt-and-nut assemblies can be easily taken apart.
Applications of Riveting Process
1. Aircraft Manufacturing Industry: Despite advances in welding and brazing processes, riveting remains a preferred method for constructing aircraft bodies and parts like wings, primarily due to the use of Aluminum. This material, prized for its lightweight and other mechanical properties, poses challenges for welding. Riveting provides strong joints for aluminum parts without needing heat, enabling the joint to withstand vibrations and harsh conditions aircraft encounter.
2. Building Construction: Many parts of residential properties, such as aluminum window panes and fiberglass rooftops, utilize riveted joints. Riveting provides a valuable alternative to nailing or using fasteners in the construction industry.
3. Wall Mountings and Sign Boards: Riveting is suitable for mounting decorative pieces on walls or ceilings or affixing name plates and signs to these surfaces.
4. Jewelry Making: Riveting offers a simple, easy way to join two or more pieces of jewelry. It demands less skill than brazing, making it accessible for hobbyists.
5. Woodworking: Riveting may be used instead of nailing in items such as bookshelves and cabinets due to its superior durability and neat appearance.
6. HVAC Ducting Work: Rivets are preferred over screws for HVAC ducting. While screws can catch particles leading to complications, rivets ensure a strong, neat joint. Pop-type rivets with pins are typically used for these applications.
7. Consumer Electronics Industry: Electronic devices like computers, laptops, televisions, and others often use plastic rivets for joining rubber and plastic parts.
8. Automobile Industry: As the industry moves towards replacing steel with aluminum, riveting plays a critical part due to the challenges in welding aluminum. The riveting process prevents damage to aluminum’s mechanical properties caused by welding heat, provides corrosion-resistant joints, and allows for joining steel and aluminum.
Advantages of Riveting over Welding
- Heat-Free Process: Riveting doesn’t need heat, preventing any damage to the mechanical properties of aluminum.
- Eliminates Galvanic Corrosion: The use of self-piercing rivets solves the problem of galvanic corrosion, offering water-tight joints.
- Efficiency: Compared to welding, riveting is a faster and cleaner process.
- Versatility: Self-piercing rivets made of galvanized steel can be used for this process.
- No Pre-Drilling Needed: Self-piercing rivets don’t require pre-drilling.
- Material Compatibility: Riveting allows for the merging of steel and aluminum.
- Environmentally Conscious: The riveting process is environmentally friendly.
- Other Options: Clinch rivets, a type of self-piercing rivet, can similarly be utilized.
Use of Rivets in Car Manufacturing
- Blind Rivets: These rivets join different parts of the car, such as the chassis, the seat structure, door hinges, non-metallic bumpers, and wheel guards. Blind rivets also assist in bonding softer, more brittle materials, such as parts of the dashboard and interiors.
- Self-piercing Rivets: This design is widely used to fabricate car bodies and other parts.
- Blind rivets and rivet nuts come into play when assembling parts of a passenger car, including speakers, radiators, engine exhaust systems, door hinges, chassis parts, car seats, the car’s steering column, and wheel rims.
How To Select The Correct Rivet?
Choosing the Correct Rivet
To ensure a stable rivet joint, selecting a rivet of the right type and size is crucial. Riveting charts in any engineering handbook can guide this selection, helping to match the rivet size to the thickness of the work you’ll be doing.
Rivet Diameter
The rivet size – including stem and head dimensions – should correspond to the size of the drilled holes in the parts to be riveted. If the rivet stem is smaller than the hole, the gap will weaken and the joint will possibly leak. Ensure that you measure these holes accurately to choose a suitable rivet.
Grip Range
A rivet’s grip range defines the minimum and maximum thicknesses of the work it can join effectively. For instance, to join two pieces that are each 1/8″ thick (totaling 1/4″ or 2/8″), a rivet with a grip range accommodating this thickness is needed. An optimal grip size that matches the riveted thickness is chosen to ensure good shear and tensile strength and prolong joint life.
Head Size
Rivet heads can be countersunk, flat-type, or domed. Each type offers a different look and feels, with countersunk heads hiding within the surface, domed heads standing out visibly, and flat heads providing more surface coverage. The head contributes significantly to the joint’s fastening strength.
Fitting Rivets | How to Fit the Rivets?
Steps for fitting rivets vary by type, but here’s an overview using a solid rivet as an example. A solid rivet has a solid pin (shank) and a flat head.
Necessary items and tools: To begin, gather your materials – the rivet in the required size, a marker, a drill gun with a drill bit that matches your rivet size, a pneumatic hammer or hand riveting tool.
Steps to Fit a Rivet:
- Prepare the workpiece for riveting according to your plan.
- Using the marker, pinpoint the locations for your rivet holes according to the pitch outlined in your drawing.
- Hammer a center punch onto these locations before drilling the holes.
- Place the rivet into the hole and form the rivet head on the other side using your pneumatic hammer or hand riveting tool. The tool should contain a die to shape the head correctly.
- Repeat this process with each rivet hole. The resulting riveted joint can be a lap joint or butt joint.
Removing a Rivet | Can You Take Out a Rivet After Riveting It?
Can a Rivet Be Removed? Yes, rivets can be carefully removed without damaging the workpiece. Remember that the removed rivet cannot be reused, and the time and effort necessary to remove it will depend upon the rivet’s material. Softer rivets, like those made of Aluminum or copper, are easier to remove, while steel rivets may require more exertion.
Safety Precautions: Always wear protective eyewear for safety.
Methods of Rivet Removal
- First Method: Using a plier to securely grip the rivet head, try pulling out the rivet. Softer rivets might yield to this method.
- Second Method: Punch the center of the rivet head using a center punch. Measure the rivet hole, then use a matching drill bit to drill through the rivet, lubricating the drill with cutting oil to minimize friction. Remember to drill slowly, periodically removing the drill to allow drilled chips to escape. Once the drill emerges at the other side, remove it, and the rivet head should come out with it. It’s ready for another rivet after removing the burrs from the rivet hole.
Conclusion
The riveting application represents an incredibly diverse and advantageous practice, extending its reach across many industries. Its appeal is not exclusive to industrial practices but also extends to enthusiastic DIY practitioners who find it a practical and valuable skill to possess.
The information in this article not only enlightens you regarding the full potential of this technique but also encourages you to explore and optimize riveting in your projects. Furthermore, rivet selection, fitting, and removal principles have been meticulously detailed to ensure you’re equipped with comprehensive knowledge.
By embracing these fundamentals, riveting can help you maximize your work’s longevity, strength, and efficiency. Let the art of riveting empower you, and revel in the practicality and versatility it offers.
Reference:

