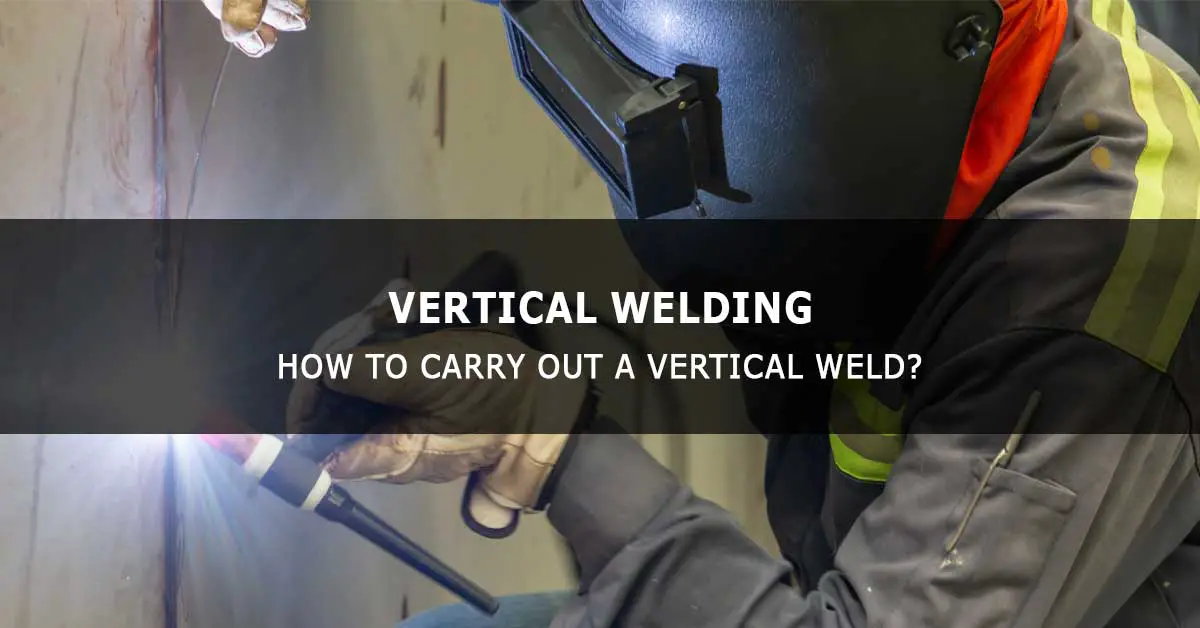
We are all conversant with welding the base metals in the flat or horizontal position. But in many fabrications like structural welding and shipbuilding, the welder has to do the welding in horizontal, vertical, and overhead welding positions since the heavy structure cannot be moved to suit the welder.
Is a vertical weld different from a weld in flat or horizontal welding positions? Does vertical welding require more skill? We shall consider all these questions in this article.
One piece of advice to new welders is that you should not attempt vertical welding unless you acquire sufficient skill and experience in basic welding positions.
How to do a vertical weld
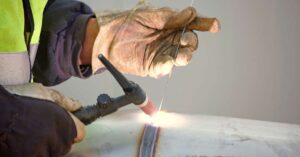
Fabrication in the shipbuilding industry, construction of buildings, pipe fabrication, and many other industries require the welder to position themselves at an elevated place to do the welding of base metals that are directed upwards. Such welding is called vertical welding.
Since such a huge structure cannot be laid down in a flat or horizontal welding position, the welder has to do a vertical position weld by positioning themselves appropriately.
When you attempt to weld in a vertical position (vertical up or vertical down), you first notice that it is harder to do a vertical weld than weld in a flat position. The same gravity that had helped you to fill the weld groove with molten metal in the flat position makes the molten weld metal and slag drip down, and you will feel the difficulty in managing the molten metal and slag. There will be more spatters.
Does this mean that you should not attempt vertical welding? No, not at all, some proper techniques will help you to do vertical position welding successfully with confidence, and you have to learn these techniques and skills.
Vertical welding can be vertical up (welding from bottom to top) or vertical down (welding from top to bottom). Vertical position welding needs both skill and experience, and a beginner welder should not attempt this welding position without getting good experience in flat and horizontal welding positions.
When the welder welds vertically up, they build the weld weave by weave, and each weave supports the next weave during welding. Vertical up welding needs both skill and patience. Expert welders suggest keeping the weave width equivalent to 1.5 to 2.5 times the electrode diameter. The weave pattern can be zigzag or Z-type.

Vertical down welding is welding from top to bottom. Since you have the threat of molten metal coming down due to gravity, you use a fast-freezing type electrode and adopt a higher welding speed sped to keep the arc ahead of the weld puddle and slag.
Welding vertically up is preferred for thicker materials since it gives good penetration and vertical down welding is preferred for thinner base metals since the low heat eliminates the problem of warping and blow holes.
Even though you can follow any welding process for a vertical weld, the preferred welding process is SMAW or stick welding. The advantage of stick welding is it has many electrodes designed for this type of welding. Vertical welding can be vertical fillet (3F) and vertical groove (3G) welds.
Can you use MIG for vertical welding?
MIG welding is the favorite of beginner welders since it is easy to learn and master. However, using MIG for vertical position welding requires experience and skill. MIG is not popular for vertical welding, especially when you have to stand at an elevated place to do this type of welding. The stick welding technique is preferred in all such locations due to its simple setup.
However, MIG has applications in vertical welding in many places. Huge tanks are fabricated for rail or road tankers, and similar tanks are also required in industries dealing with oil and gas. Such tanks are 8 feet or more in diameter and 20 feet or more in height.
The method of fabrication is simple. The standard width of the required thickness of the mild steel coil is cut to the calculated length (circumference of the shell), rolled into the cylindrical form, and welded at the ends to form the shell. This welding can be done vertically up or down or by placing the shell horizontally.
Such shells are joined together to build up the tank height. The circumferential joining of two shells can be done using MIG vertical up welding or vertical down welding. A fixture may slowly rotate the shell in a clockwise or anticlockwise direction for easy vertical down or vertical up welding. The shielding gas used can mix 10% carbon dioxide and 90% argon or other suitable combinations.
Can you use TIG for a vertical weld?
Unlike stick and MIG welding, TIG welding needs the engagement of both hands. TIG welding is a highly-skilled, costly, and difficult process for vertical welding; hence, it is not the preferred process for vertical welding.
However, as explained under MIG, huge stainless steel tanks are fabricated for use in food processing industries (including milk dairies), chemical industries, and pharmaceutical industries. The method of fabricating a stainless steel road tanker or a storage tank is similar to manufacturing mild steel tanks (explained under MIG).
TIG welding is used for welding these tanks, and vertical up, vertical down, and horizontal welding are used during the fabrication. The shielding gas used will be normally 100% argon.

Vertical stick welding
Stick welding is the popular choice for a vertical weld due to its simple setup and availability of electrodes designed for vertical welding. For vertical stick welding, the first step is to select an electrode capable of welding in a vertical position. The stick electrodes recommended for vertical welding will be of fast freezing type. The flux coating on fast-freezing stick electrodes is designed so that the molten weld metal solidifies faster than other electrodes.
As per AWS (American Welding Society) numbering system, standard five-digit identification E XX XX represents a normal stick welding electrode. Let us consider an example, E 7018. The third ‘X’ (‘1’ in our example) indicates the capability of the electrode in different welding positions.
The number’ 1′ in the third digit ‘X’ indicates it is an all-position welding electrode (the number ‘2’ indicates it can be used for welding in horizontal and flat welding positions only, and the number ‘3’ indicates it can be used for welding in flat position only).
So, you have to ensure that the selected electrode for vertical welding has an all-position welding recommendation. E 7018, E 6010, and E 6011 are some electrodes capable of welding in all positions (including vertical).
The welding experts say that you can do vertical up welding with all electrodes with all position welding ratings (the second digit from the last is ‘1’ or E XX 1X). Still, only some can be used for satisfactory vertical down welding. The experts say:
- E 7018 does not give satisfactory results for vertical down welding.
- E 6013 can work satisfactorily for vertical down welding only when the selected electrode diameter is 1/8ʺ or less.
- E 6010 and E 6011 electrodes give satisfactory results for vertical down welding.
- The welder has to avoid electrodes of diameter more than 3/16ʺ because higher diameter electrodes create uncontrollable molten weld puddles. Always keep the electrode size lower.
- Some specially designed electrodes may be for special applications like vertical down pipe welding.
How to decide whether to go for vertical up or vertical down welding?
Experienced welders advise vertical up welding for thicker metals because, apart from better visibility and better control over weld puddles, you can achieve deeper penetration into the base metals to strengthen the joints.
- Choose vertical up stick welding when welding base metals of 1/4ʺ mm thick or more.
- For base metals of thickness 1/8ʺ to 1/4ʺ, you can go for vertical up welding only if it is a fillet weld.
- Vertical down welding is preferred for base metals of thickness 1/4ʺ or less, which prevents warping and other weld defects.
Welding techniques for vertical up stick welding
When you do stick welding, the normal mode is to pull the electrode to keep it ahead of the slag (or to keep it behind). But vertical up welding can be an exception because gravity pulls the slag down in vertical up welding, and you can do the welding by pushing the stick electrode up. The welding arc pointed towards the base metals helps you to go for deeper penetration, and another advantage is good visibility of the weld puddle.
When doing vertical up stick welding, you should create a small and controllable weld puddle by selecting a smaller diameter electrode, lower amperage setting, low travel speed, and a tight welding arc length. The weld puddle size should be appreciably less for vertical welding compared to flat position welding.
The advantage of a strong arc and slow travel speed in stick welding is it can burn off surface contaminants like paint, galvanizing, rust, mill scale, and others. The traveling angle of the electrode for vertical up welding is around 100° to 105° as illustrated below.

Weld beads for vertical up stick welding
When you do vertical up welding, you have different and better ways of manipulating the molten metal puddle and can create various types of weld beads to complete the weld joint.
Straight beads or stringers are used for the first pass on many occasions. A straight bead needs less heat input and creates strong weld joints. However, doing the complete welding with a stringer bead will need multiple passes and may face the problem of a lack of fusion between weld passes.
After the first pass of the stringer bead, further passes can be done using weave beads, and weave beads are a great way of faster filling of weld grooves. Weave beads are suitable for metals of 1/4ʺ or thicker. Vertical up welding of thin metals (less than 1/4ʺ) can be done with stringers since they require low heat.
Z weave weld bead is the most popular, and you can create the weld puddle over the toe of the previous bead. Start the ‘Z’ weave from the left toe; a puddle is created over the toe of the previous weld bead. Move the electrode to the right toe and hold for a second, then move the electrode to the left (starting) side in a diagonal line and repeat these steps till you complete the weld length.
The molten weld pool flows to fill the center. The maximum width of the ‘Z’ weave bead can be up to five or six times the electrode diameter. Keep a good travel speed to avoid convex beads. In this ‘Z’ weave welding, the first weave (left to right weave length) solidifies and supports the second weave as a shelf/brick, and this continues till the end of the welding. The momentary pause ensures good fusion.

Vertical up stick welding issues
Vertical up welding is a slow process, and this can result in the upper part of the base metals getting red hot as the welding progresses and can lead to a situation called ‘arc blow‘ where the magnetic forces are generated and force the arc out of the desired path.
This problem can be addressed by using a run-off tab at the top end (a 2-inch length dummy base metal (of the same shape) tack welded at the top end) and cutting it off after completing the welding. The run-off tab will absorb the excess heat and also eliminates the crater.
Vertical down stick welding
You cannot depend on the support provided by the Z weave for vertical down welding. A slow vertical down welding will result in molten weld metal dropping down due to gravity. To overcome these problems, you must go for a straight bead and higher weld travel speed to keep the molten metal and slag behind the arc.
The faster welding speed reduces the heat transferred to the base metals, resulting in shallow penetration. Since vertical down welding is adopted for thin base metals, this helps to prevent the warping of base metals and blow holes. Vertical down welding creates good-looking weld beads.
One risk in vertical down welding is the molten puddle overrunning the arc, and the effect can be a lack of fusion of the weld metal with the base metal and slag inclusion, which will be serious defects. The weld bead may look ugly. A lack of fusion can also occur if the welding speed is too fast.
Most welders prefer vertical down welding as they feel it is easier than vertical up welding since it does not need weaving techniques and is a simple straight weld. However, the welder has to take care of the arc being ahead of the weld metal and slag.
Polarity, current type and arc length
The coating on the electrode guides the type of current and the polarity used for stick welding, and you can get the recommended current and polarity from AWS standards for the electrode, or it is printed on the outside cover of the electrode box.
For vertical up welding, DCEP (direct current electrode positive) polarity (reverse polarity) is preferred, giving the deepest penetration. This works well since vertical up welding is used for thicker base metals.
For vertical down welding DCEN (direct current electrode negative) polarity (straight polarity) is preferred since it releases lesser heat into the joint (low penetration), and there is no risk of burn through or warping. This works well since vertical down welding is used for thinner base metals.
You can go for AC when vertical down stick welding to reduce the problem of arc blow. However, restrict the use of AC since it creates a little unstable arc, which is not good for vertical welding.
Amperes setting
Every electrode manufacturer prints the recommended range of amperes on the electrode box for the diameter and type of electrode packed inside the box. For the same type and size of electrode, the recommended range of amperes can vary from manufacturer to manufacturer.
There can be a difference in the ampere set (displayed on the stick welding machine panel), and the current at the electrode, and this variation can be appreciable in lower-end welding machines.
The joint design for flat and vertical welding will be similar, but making a tight-fitting joint design makes vertical welding a lot easier, and for thicker base metals single V groove joint is good.
The amperage setting for vertical welding is normally 10% to 15% less compared to flat welding, and we always go for a lesser-diameter electrode for vertical welding. Based on the practical situation, the ampere can be decreased or increased in increments of 5 amperes to arrive at the correct setting.
For vertical down welding, you can go for an electrode diameter compatible with the base metal thickness, set the ampere slightly, and use a higher welding speed.
Arc length
Maintaining a tight and steady arc (an arc length not more than the electrode diameter) is important.
A beginner welder may want to keep a longer arc length to avoid sticking the electrode to the base metal; this is incorrect since the reason for the electrode sticking to the base metal is low amperage settings. A long arc will not help the problem of the electrode sticking to the base metal.
In flat welding, a long arc length effect will not be quite visible, but it may lead to weld defects in vertical position welding. Maintaining a tight arc length is difficult for beginner welders since the electrode becomes short as it melts, and the welder has to move it down to maintain the tight arc.
Electrodes for vertical stick welding
E 7018 is a good electrode for vertical up welding since it fills the joint with weld metal faster than other electrodes. E 7016 is another electrode that is good for vertical up welding. However, this is a costlier electrode and is not easily available.
E 6010 and E 6011 electrodes are good for vertical down welding since they deposit weld metal that freezes fast (fast-freeze).
Welding tips by expert welders
- It is good to have clean base metals for vertical welding. As this will ensure strong weld joints in vertical up welding. Clean base metals help to keep up fast weld traveling speed during vertical down welding since fast weld speed cannot burn coating and impurities.
- Position yourself comfortably for the position of the work; your hand must not go above the chest level when the welding is completed. Such a position ensures better stability and arc visibility.
- Use the free hand to grip a nearby surface during vertical welding or tack weld a gripper for your holding. This will give you a steadier welding hand to manipulate the weld puddle.
- Do a trial welding with a smaller diameter electrode (3/32ʺ will be okay).
- Wear your welding gear, including a good leather jacket with long sleeves, hand gloves, shoes, good quality welding helmet, and cover your head. You have to safeguard yourself from falling weld metal in a worst-case scenario.
- You can fix the electrode in the electrode holder (stinger), pointing upwards for easy manipulation.
- When doing multiple weld beads in vertical up welding, if you notice metals getting overheated, pause to allow it to cool before starting again.
- Documenting your weld settings and the result achieved is good practice and will help you save time when welding similar work next time.
Conclusion
Vertical welding needs experience and skill, and a welder who can do quality vertical welding will command money and respect. I hope this article has given you some insight and tips on vertical welding.
References