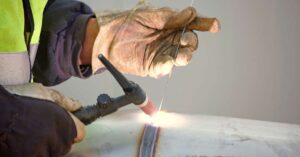
Horseshoe welding is a great do-it-yourself welding activity. Everything you make adds a unique edge and is rustic. Although there are countless horseshoe welding projects, we have selected a few that only require basic welding knowledge and less materials.
Every horseshoe project can be used for anything specific or decorative. Unsurprisingly, several welders make unique items on the side with such creative welding project ideas, making them advantageous to sell as well. Here are several amazing DIY crafts that you can utilize all over your house if you have several extra or old horseshoes.
Horseshoe Welding Projects Ideas
Horseshoe Wine Rack
A horseshoe wine rack is a classic piece if you enjoy a glass of red wine and need something special to keep the bottles. Working on this DIY welding project is enjoyable and allows you to showcase your craftsmanship.
The horseshoes should be thoroughly cleaned to remove any corrosion. For this welding project, a wire brush comes in quite handy. To create a (U) shape, choose three horseshoes. To join the three horseshoes together, use the welding flame to create a butt weld between their sides.
To create two identical (U) forms, repeat this technique. Choose two more horseshoes, then connect their bottoms to the tops of the three you have already welded together. Join the base of a third horseshoe to the two you’ve just welded together. Repeat the same procedure until you have two sets of six welded horseshoes. Put each steel rod so that it is at a (90-degree) angle to the horseshoes at the base of each (U).
Safely weld each rod into position. To attach the rack and link all twelve horseshoes, weld the base of each of these rods to the (U) on the opposing horseshoe. Consider adding a coat as an optional finishing touch. Overall, I believe a matte black finish on the wine rack looks great.
Now you have just made a trendy horseshoe-shaped wine rack for the kitchen that will look terrific. Then stock up on various bottles of wine and start enjoying it.
Horseshoe Wine Rack Process
DIY Horseshoe Towel Rack
The horseshoe tip should be placed at the second notch from the base, then weld horseshoes. Weld every horseshoe to perfection. Turn the welded horseshoes around, align two at a (90-degree) angle, and check the squareness of the horseshoes using a carpenter’s square.
The horseshoes should be tack weld at a (90-degree) angle. Ensure that the wire is fit and both horseshoes are flat. Rebar should be tact-welded to the horseshoes. Complete the welding of the rebar and both horseshoes.
Horseshoe Towel Rack Process
Horseshoe Boot Rack Welding Project
For a uniform distribution, use a piece of square tubing. Before tack welding the horseshoes together, make sure they are square. To create an additional line of six horseshoes, repeat steps 1 and 2. Five horseshoes should be arranged vertically and face down.
Connect the five horseshoes using tack welding. Repeat steps four and five to create a total of 5 horseshoes. To ensure the new design is even, use the finished pattern of the five horseshoes from stages four to five as a template. Use the carpenter square to check the squareness of the end pieces while holding them at a (90-degree) angle.
To make sure the end pieces are parallel, use a piece of round tube and push the end points up to it. Make the tip of the other horseshoe from the base of the boot, holding the horseshoe level. Attach the boot holder’s horseshoe sides to the end pieces by tacking welding. On every side, complete the welding. Add additional support by welding underneath.
Tack welds each side after bringing the second horseshoe boot holder part flush with the edge of the end part of the horseshoes. For extra features, finish the weld on either side and weld below. One rebar should be placed in the middle, in between the lower horseshoes.
Tack welds another end to the rebar after measuring almost the same height on the two ends. Completely weld the rebar on both edges.
Horseshoe Boot Rack Process
Horseshoe Christmas Tree
Making Horseshoe weld Christmas tree craft while improving your welding skills is fantastic. Any horse lover would love to receive this simple-to-make, unusual Christmas tree. Only 16 used horseshoes and a few steel scraps are required for the entire process. Remove all of the pins that were still in the shoes by using tweezers.
Use the largest shoe for the “stem” of the Christmas tree. Now, arrange four shoes of identical sizes above the trunk. Three shoes were in the next row, then two more pairs.
Some were repositioned to ensure that at least two touched the others. After making last-minute shoe changes, place one shoe at the tree’s highest point.
Continue welding the joints once all the shoes are in position. Turn it over to the opposite side after all the joints have been welded. Set up 3 horseshoes for the base, and then weld them together along both sides. To enable welding the tree to the support, fill the interior of the bottom.
The horseshoes have rust and filth on them. This is easily cleaned by using a grinding disc. Using an angle grinder’s wire brush tool, remove the last of the rust and debris. Previously to the base being attached, it is simpler to clean it up.
Utilize some nails and wooden pieces to secure the tree. Ensure that it is straight. After you are done welding, polish the joint to make it suitable for painting. It only needs a few light coats of matte black spray paint to be finished. You might also add some baubles to it.
Horseshoe Christmas Tree Process
Horseshoe Coat Rack Welding Project
A coat rack is necessary for every home. Another enjoyable and simple project is to create a rack using horseshoes. Dust and rust should be removed from the horseshoes. Lay out four horseshoes in a (U) shape in a straight line on the table. If at all feasible, lock these in place to keep them fixed.
On each of the three parts in which the horseshoes touch, properly lay a butt weld. As the four flat horseshoes join at the base of the U, take another horseshoe and position it perpendicular to them. (45-degree) forward tilt of the horseshoe weld into place while holding it in one hand. On every flat horseshoe, repeat this technique.
With this one, you can attempt many different versions, so don’t hesitate to experiment. If you have several coats, you can make it stronger or experiment with horseshoes at various angles.
Horseshoe Coat Rack Process
Horseshoe Pumpkin Welding Project
Making a horseshoe pumpkin is simple by connecting several horseshoes. You could sell These excellent Halloween decorations to customers and businesses searching for original ways to decorate. The simplest and quickest method was to remove the nail head using a hammer. You can skip right to welding if you’re using brand-new horseshoes. You can now begin cleaning the worn-out shoes.
With one horseshoe pointing up and the other down, begin welding. To align them for the initial weld, use a steel bar. To ensure that the top and base of every horseshoe are lined up, try to position them all in the same direction.
Once the first two have been welded from end to end, utilize magnets to keep them upright while you tack weld the horseshoes in the X design to the first two. Attempt to tack weld each one before adding a solid weld bead to the base and top of the connection point to hold it all together.
The steel should be curled at the end and progressively rolled up. Once tightly coiled, use a set of pliers and hold the steel’s point, pulling the center out to create a twisting vine. After trimming the vines to the required length, the vines were each welded to the pumpkin stem in the ideal location. Give it a fresh coat of orange spray paint to stop rust.
Horseshoe Pumpkin Welding Process
Horseshoe Sunflower
The horseshoes should be turned on their right side and arranged in a flower arrangement. Ascertain that the ends are flush. Horseshoes should be tacked and welded. Install rebar for the stem and level it by setting a horseshoe beneath it. Tack welds the stem on all sides.
Before welding, carefully check that the stem of the sunflower shape is straight. Join the flower petals’ stems with welding. For the petals, divide one horseshoe in half. Weld the flowers and stems.
Horseshoe Sunflower Process
Horseshoe Yard Cup Holders
Put the rebar in an upright position by using two magnets and align the center of the horseshoes. Horseshoes should be tact-welded to the rebar. Ensure that the horseshoes are centered and flat.
Finish welding the two horseshoes. The position of the base cup holders should be noted. For the horseshoes, make cup stoppers and weld them. Attach and weld the holder’s base horseshoes to the frame.
Tack welds a 10-inch rebar in the middle, close to the base of the stand. Make sure the 2 rod pieces are square using the carpenter’s square.
Horseshoe Yard Cup Holders Process
Horseshoe Puzzle
This is a popular horseshoe puzzle. Small pieces of chain are used to connect two horseshoes permanently. A steel ring surrounds the chains. Making this add to your collection of handcrafted puzzles would be enjoyable. Trim the rounded tips with a metal band saw.
To make clean, the surface of the metal for welding, remove the scale from the tips using an angle grinder and a flap disc. The chain was supported in place by several laminated sample chips, and the shoes should place on a metal welding table.
Attach the chains with the horseshoe tips with tacks. After then, complete beads were fused to the chain links to join them to the horseshoes securely. The left side needs to be cleaned up using a steel brush. A welded horseshoe puzzle is ready.
Horseshoe Puzzle Process
Welding a Heart from Horseshoes
Prepare the horseshoes by cleaning them and taking out any remaining nails from the shoes. Most may be removed using a pair of pliers, but some may require a few solid blows from a hammer.
Cut out the rivet securing the rubber bottom pads still attached to several ranch shoes. Remove the debris and filth from the shoe with a decent sandblaster, and this method is the simplest and most efficient. This gives the shoe a great matte appearance while removing most rust.
Select a pair of horseshoes that are around the same size and form. Use an angle grinder to split the third pair of shoes in half. It also works with a saw with a metal-cutting blade. Set the four pieces out on the tabletop overlapping to form a heart, now label and cut at the connection places to achieve a heart shape that is more reminiscent of a real heart.
To make the cut edges sit flush, grind them down. Although not essential, it subsequently helps to avoid holes when welding.
Put the shoe pieces together by tacking them. Don’t fully weld them yet because you may have to make a small adjustment. Before completing the heart, you will want to polish them.
To smooth out some of the roughness, run the rear face of the shoes all across the sander. After the welds have been cleaned up, you may leave the mostly sanded surface alone or polish the surface.
Horseshoe Heart Process
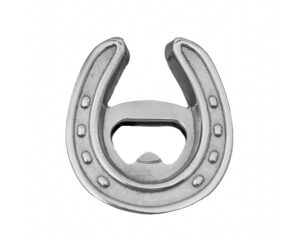
Horseshoe Bottle Opener
Making a bottle opener with horseshoes is easy for a beginner welder. It takes just a minute to properly weld the steel bottle opener to the original horseshoe. You can make it shiny and colorful. Both painting it matte black or polishing it to shiny metal will give it a unique style.
Firstly, you need a clean horseshoe. Then a bottle opener is required. Join the horseshoes with a bottle opener by welding. Paint it with matte black color and polish it. Your unique horseshoe bottle opener is ready.
Horseshoe Bottle Opener Final Result
DIY Horseshoe Bench
The use of a bench is widespread. However, using horseshoes for making a bench is rare. First, reduce the size. When people sit close to the edge of the bench because of the excessive slats overhang, the bench may fall. Cut them down to increase stability. Nobody likes to be dropped to the ground when attempting to sit down.
Because the legs are fastened to the slats, this is a relatively easy project. Apply enough rust-inhibiting paint to fix up the legs. After a few minutes, remove the rust with a wire brush and a wire cup on an angle grinder. Next, paint it in a high gloss finish in black.
Apply gloss urethane once they have been sanded. Just too much shine for the appearance. Then, with some solid screws, it is quickly put back together. To connect the slats, add a few more horseshoes. Perhaps, this will provide a tiny bit more strength. A horseshoe bench is ready.
DIY Horseshoe Bench Process
Horseshoe Dutch Oven Holder
A Dutch oven holder made from a horseshoe is an ideal gift for a special person on any special day. A horseshoe Dutch oven holder would be perfect if you cook with a Dutch oven and wouldn’t want to burn your table.
The first step involves cleaning the horseshoes of any pins and dirt. Don your safety glasses before you begin. You can remove the nails by using a grinder. The time has come to begin welding. After 3 sides have been welded together, use a pair of pliers to rotate the horseshoe so that it is now pointing downward. The other side should now be welded.
Put your horseshoes where you can set them down with a pliers set. Just use a hammer to remove the slag left on top of the welds while pushing the horseshoes to whatever you’ve got. Cut the steel rod into three smaller, three-inch-long rods with the metal-cutting saw.
Flip it now with the bottom pointing up. The rods should be (90-degree) welded. If you’re using a magnetic device, it can hold the rods straight. Remove everything keeping the rod upright and then hold it in place.
You may need to grind down anything spiky or harsh after welding the rods. Make an effort to flatten the rods as much as you can. Apply a polisher on both sides and paint them. One coat is best for painting the horseshoe Dutch oven holder.
Horseshoe Dutch Oven Holder Process
Conclusion
These horseshoe welding project ideas provide you with some inspiration for some fun DIY projects for the house. All you require are some used horseshoes, a welding tool, and safety gear. But don’t think that using horseshoes is the only thing you can do. You can make a virtually endless variety of household products and projects.
Reference