Boating is a good leisure hobby that allows you to be amidst nature. You can use your boating time to enjoy the beauty of nature and engage in various activities like fishing and meditation. Whether you own a simple bass boat or a larger vessel with a superstructure, one thing remains common; your boat will eventually lose its shine and require a fresh coat of paint. This is where knowing how to paint your boat becomes essential.
In this article, we’ll discuss the different aspects of painting a boat. We’ll cover the advantages of taking on the project yourself, the various types of paints suitable for boat painting, and a step-by-step process to assist you in achieving a professional-looking finish with regular maintenance. Let’s get started!
Is Painting Your Boat Worth it?
Many of you might have painted a door or a portion of the wall of your home. But is it possible to entirely paint your boat on a DIY basis? Well, you must first understand that boat painting is more complex than a door or wall.
Secondly, the work involved depends on the size and complexity of the boat. It requires many working hours, material, and patience. If you are inclined to invest your time and have the patience to learn and do it, then you can successfully attempt it.
You have to do the boat painting at regular intervals. If you leave the boat without maintenance for a very long period, only a professional can bring it back to its original shine, which can be costly.

The Three Parts of a Boat Paint Job
- The first part is removing all the possible hardware and protecting the remaining hardware with painter’s tape.
- The second part is preparing the surfaces for painting, which involves getting rid of the existing coating of the paint and creating a profile or texture required for good adherence.
- The third part is applying the recommended primer and paint.
The second part is the most challenging and laborious, and you have to understand the work involved before deciding whether to do the boat painting on a DIY basis and whether it is worth it.
However, there is one solution. You can offload the surface preparation job to a wet abrasive blasting expert and do the remaining work yourself (parts one and three). Wet abrasive blasting is an effective, fast, and environmentally friendly solution for preparing the boat surfaces for painting.
The wet abrasive blasting can create the required texture or profile on the surfaces for good adherence to painting. Wet abrasive blasting is possible on wood, aluminum, and fiberglass. The advantage is it can reach and remove the old paint from all the nooks and corners of the intricate inner boat surfaces. You can enquire with your local contractor; they usually have portable wet abrasive blasting units.
Types of Coats / Paints Available to Paint Your Boat
The paints used for boat painting are called marine paint, and they are manufactured suitable for the marine environment and to protect your boats from salt water and lake water.
Marine paints give corrosion and abrasion resistance to the painted surfaces and maintain hydrodynamic properties. Some marine paints also have anti-fouling and self-cleaning properties.
Different paints are available in the market, like simple enamel paints, single and two-step polyurethane, etc. Polyurethane paints last longer than enamel paints. Ensure the selected primer and paint are compatible.
Paints for the Topsides of the Boat
The topside includes surfaces above the waterline, such as, hull, deck, and the inside from the gunwale. Marine paints used for boat top painting should resist UV (Ultraviolet) rays since they are exposed to the sun and susceptible to UV damage.
Paints for Bottom Side of the Boat
This refers to the portion below the waterline. Marine paints used for boat bottom painting should resist aquatic and marine growth.
Types of Paints Suitable for Different Boat Types
Your boat may be of wood, aluminum, or fiberglass. Let us briefly discuss the paints suitable for painting these boats.

Aluminum Boats
Marine grade aluminum paint for boats can be used for touching up or restoration. The advantage of aluminum paint is it dries fast, and some aluminum paints do not need a primer.
Aluminum paint can be used on all the areas of the boat (boat bottom painting and top painting). Read the manufacturer’s directions for applying this paint.
Wooden Boats
If you have a wooden boat, it is better to stick to the traditional oil-based paints recommended for marine applications.
Spending money on expensive two-part paint may not be worth it since a wooden boat swells and flexes typically along the seams, and the paint, whether oil-based or two-part, has the same life. Make sure to read the manufacturer’s directions for applying the paint.
Fiberglass Boats
Fiberglass boats can be painted with enamel paint, one or two-part polyurethane paints, gel coat, etc. This can be “rolled and tipped” or sprayed onto the boat’s fiberglass surface.
Ensure the paint is recommended for marine use and read the manufacturer’s directions for applying the paint. Some manufacturers offer acrylic latex paint for painting fiberglass boats.
One-part Enamel Paints
These paints do not involve mixing different ingredients; they are economical and easier to use than high-end paints. Conversely, they are susceptible to UV damage over time and need additional caution, like periodic cleaning and waxing.
Polyurethane Paints
These can be one part or two parts. Polyurethane is the most prevalent form of one-part paint because its long-lasting gloss is less expensive than two-part polyurethane paint, and it has a better and long-lasting gloss finish than enamel paints.
Two-part polyurethane paints cost more than the other paints discussed above, but they look better and last longer.
Apart from the high cost, a two-part polyurethane paint needs additional labor (for mixing) and an epoxy primer, and the painting has to be done at the recommended ambient temperature and humidity.
Interesting Read: Different Types of Boats | Your Guide to Boat Types
Step-by-Step Process of Painting Your Boat

Your boat may be of wood, fiberglass, or aluminum, but the method and steps of painting will be more or less the same.
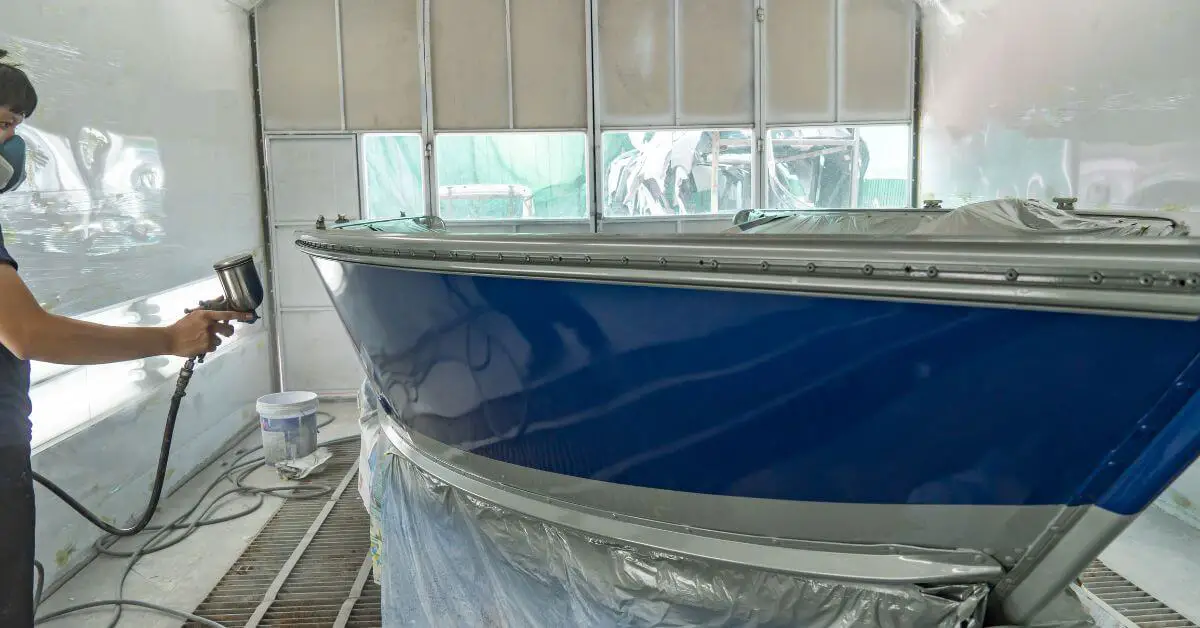
Professionals use spray painting techniques to get a good quality painting. If you have the facility, you can do spray painting. However, you can achieve a fairly good painted surface using a roller and brush, provided the surface preparation is good.
Normally, a team of two persons does the boat painting, the first person does the painting using a roller, and the second person follows the first with a painting brush and evenly removes the roller pattern using light strokes.
Steps to Paint Your Boat
Step 1. Wash The Boat
Wash the complete boat with soap water followed by clean water to remove all the dirt, marine growth, sand, etc. You can use high-pressure water if available.
Step 2. Collect the Paining Materials
Collect all the painting materials, such as, primer, paint, sander with discs, emery paper, rollers and brushes for painting, safety gear, etc. If you have yet to learn how to use a sander, take the help of a professional and learn how to use it.
Read all the instructions on the primer containers, and paint and follow the safety guidelines like wearing a respirator, safety glasses, and recommended clothes during sanding and painting.
Step 3. Repair Leakage Points
Inspect all the areas of the boat, including the superstructure and make a list of leakage points (the leakage may be through a fastener, fitting, damaged joints, corroded parts, etc.) and attend to them before boat painting.
Mark the chipped and cracked areas and rectify them. You can use the services of your experienced friend or a professional to help you.
Step 4. Protect Boat’s Hardware
Take out as much of the hardware items (bow rails, cleats, fasteners, beadings, etc.) from the boat, and the remaining are to be protected using painter’s tape. All the corroded fittings and fasteners are to be replaced.
Do not think stainless steel is rust-proof; it has higher corrosion resistance, but seawater can corrode it over time. All the rubber beadings are to be replaced.
Step 5. Surface Preparation
The next step is surface preparation. You have to get rid of the old paint and prepare the surface for the new paint, this process is called surface preparation or prep work.
Use the painter’s tape to cover the areas that are to be protected and to mark boundaries. Use a sander with 80,120, 220, and 320 grit sandpaper to remove the paint and the glassy surface and create an even and smooth surface profile/texture.
The surface preparation includes intricate inside parts, like decks, cabins, cockpits, fly-bridges, and other parts. This is a complex process and takes your time and needs patience.
Step 6. Remove Protection Tapes
Remove the tape. Wash the sanded surfaces with pressure water and a sponge and allow them to dry.
Step 7. Clean the Surface
Clean the surface using a quick evaporating cleaner and a clean microfiber cloth.
Step 8. Preparations for Painting
Cover the areas and parts of the boat that are not to be painted (with painter’s tape).
Step 9. Apply Primer Coat
Pour sufficient primer into the painting pan for one or two-hour paintings (depending on your capacity). Dip a roller into the primer to start painting, and you can make horizontal or vertical strokes with the roller. After painting about three feet, take a brush and remove the roller lines to make the painting even and smooth.
This method is called the roll and tip method. Use the roller again to paint the next 3 feet, and use the brush to smoothen. Ensure the painting looks even, continuous, and smooth. Continue this process till you cover all the surfaces (you can take the help of your friend for brushwork).
Allow the primer to dry overnight. Use the sander with 320 grit sandpaper to remove the glassy finish, and do not sand off the primer layer. Do another coat of primer and repeat the process.
Sanding with 320 or higher grit sandpaper between coats of primer and paint help remove paint bubbles, spots, etc.
Step 10. Post Primer Cleaning
Use a microfiber cloth and fast-evaporating solvent to clean the surface.
Step 11. Apply Remaining Coats
If necessary, remove the selected paint, mix the constituents, and pour the paint into the pan. As discussed above, use a roller and paintbrush to paint the surface.
Ensure the coating thickness is thin. Allow the paint to dry overnight. Sand the painted surface with 400 or higher grit to remove the glassy finish. Continue the above painting process to do the second and third coats of paint.
Step 12. Final Finishing
Use the wet sanding process with higher grit sandpaper (800 or 1000) to make the painted surface slightly dull (this will remove any visible brush lines), and then do the buffing with a buffing wheel and 1000 and 2000 grit buffing compound.
You can also wax the painted surfaces to make them shine.
The above process can be used for the top portion of boat painting, but it also applies to painting other parts of the boat. Let us discuss a few points about painting the boat hull, the inner surfaces, the boat bottom painting, and painting bass boats.
How to Paint Your Boat’s Hull?
The hull is a large and smooth surface area without much hardware to remove. You may want to protect it with masking tape. You will find it easier to paint a hull than the top sides of a boat. There are no angled surfaces or tight corners.
The boat’s hull is a near-vertical surface, and multiple thin coats are preferred for painting it since the paint from a thick coat of paint can drip and spoil the painting.
If the gelcoat on the hull is severely oxidized and has a chalky look, the oxidized outer layer will have to be removed. When done sanding, run your hand along the hull and feel for dips and grooves. You can even stretch a thin batten along the hull to double-check the smoothness of the hull.
Repair any surface imperfections like chips, dings, or gouges. Once you’ve filled all the dips and dents, allow the filler to dry.
Painting the Inner Non-Skid Surfaces of a Boat
Painting the inner non-skid or nonslip surfaces differs from painting the outer surfaces since sanding all the tiny nooks and corners of the inner boat may not be possible.
The inner boat surface may have raised patterns with space in between. Also, the wear on the inner parts of the boat will be uneven since people walk on the top of a pattern, and the space between the two patterns is left untouched.
You can select a textured compound for nonslip and non-skid painting that have minute rubberized pellets mixed in the paint.
This paint looks good and also gives an anti-slip surface. Also, you must select a special painting roller since this paint has solid particles.
How to Paint Your Boat’s Bottom?

Unlike the top of your boat, the bottom is susceptible to the growth of barnacles and other marine organisms. This means you’ll need to use anti-fouling paint when repainting a boat to keep them at bay.
You have a wide variety to choose from but choose the one that is environmentally friendly and does not harm marine life. You will find bottom boat painting is more straightforward than painting the hull and other parts.
Painting a Bass Boat
Bass fishing is a leisure activity in parts of North America to catch bass species fishes using a fishing rod, and the boat used for bass fishing is called a bass boat.
A bass boat is a small boat designed and equipped mainly for bass fishing in lakes, rivers, and wetlands. Modern bass boats are propelled by a motor equipped with an elevated front deck and a swivel chair for convenient movement around the boat during bass fishing.
Bass boats may be made of aluminum alloy or fiberglass. The small size of a bass boat allows you to propel it with oars in times of emergency.
The small size of a bass boat makes it convenient for DIY painting, and you can paint a bass boat by following the same step-by-step process discussed above.
Tips for Boat Painting and Boat Maintenance
- Paint your boat on a dry, cool day or under the shade. There should not be high temperatures and high humidity.
- One important tip for creating the best surface is to apply multiple, thin, consistent coats instead of one or two thick ones. Three coats of paint are generally considered the best.
- Follow the paint manufacturer’s instructions, allow sufficient curing time between coats, and keep an eye on ambient temperature and humidity, especially if you are painting in the open. Ensure that the temperature is between 55 and 75 F and humidity is below 80 percent to provide optimal curing.
- Adhere to the drying time specified by the paint manufacturer before taking the repainted boat into the water.
- Avoid breathing in sanding dust and paint, and solvent fumes.
- Make it a habit to rinse the boat after use in saltwater.
Conclusion
Preserving the longevity of your boat requires diligent maintenance, including regular painting. Whether you own a small bass boat or a larger one, investing time and effort into learning how to paint your boat will undoubtedly pay off in the long run.
By understanding the different types of paints suitable for boats and following a step-by-step guide, boat owners can achieve a professional-looking finish through regular maintenance.
So, take the reins and breathe new life into your boat with a fresh coat of paint that can enhance its appearance and longevity.
References: